Plugin For CMS


For websites created on These content Management System platforms, we have prepared ready-to-install plugins to ease your integration needs. Click on your preferred platform to know more about our personalised plugins!
Plugins Duitku
- Download the Duitku plugin for Woocommerce.Download Here
- Open your Wordpress Admin menu (generally in
/wp-admin). - Open the Plugins menu ➜ Add New.
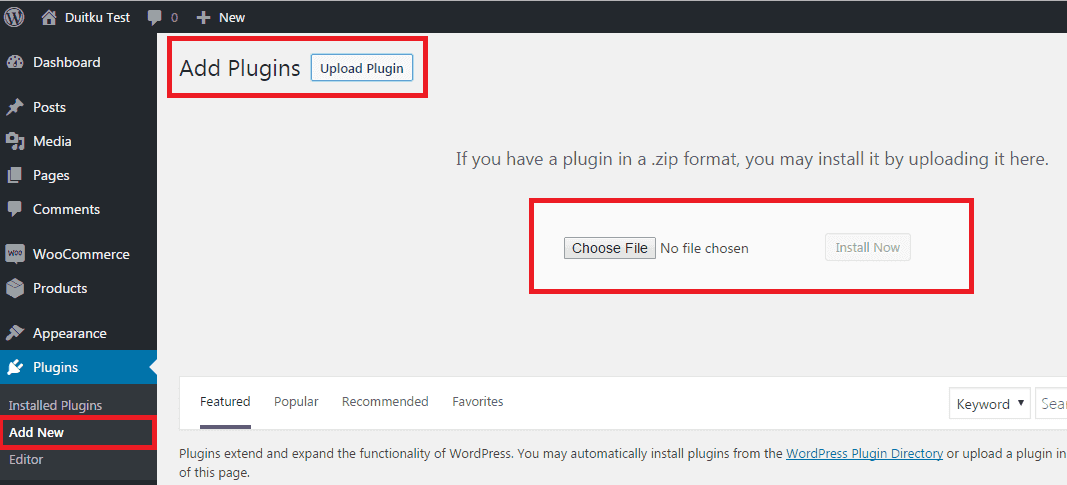
- Upload the Duitku plugin file (Make sure Woocommerce is installed before adding the Duitku plugin).
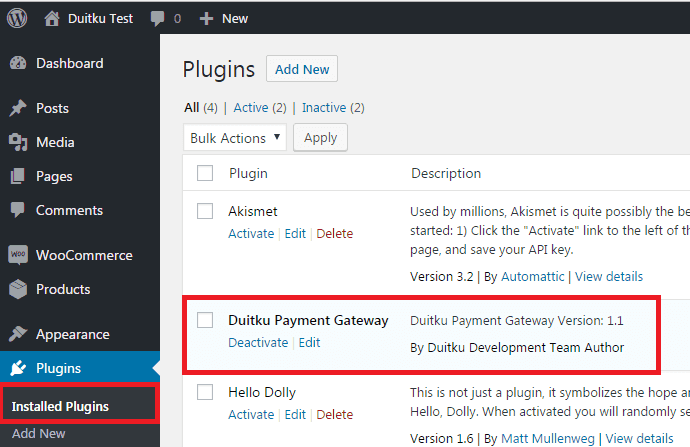
- After the plugin is installed, Duitku will appear in the list of installed plugins. Open the Plugin ➜ Installled Plugins page, then activate the Duitku plugin.
- Open Woocommerce ➜ Settings then select the 'Duitku Global Configuration' tab.
- Enter the Merchant Code and API Key, these parameters are created on the Duitku merchant page in the Project menu section
Addition :
Endpoint for the trial phase https://sandbox.duitku.com/webapi
Endpoint for stage production https://passport.duitku.com/webapi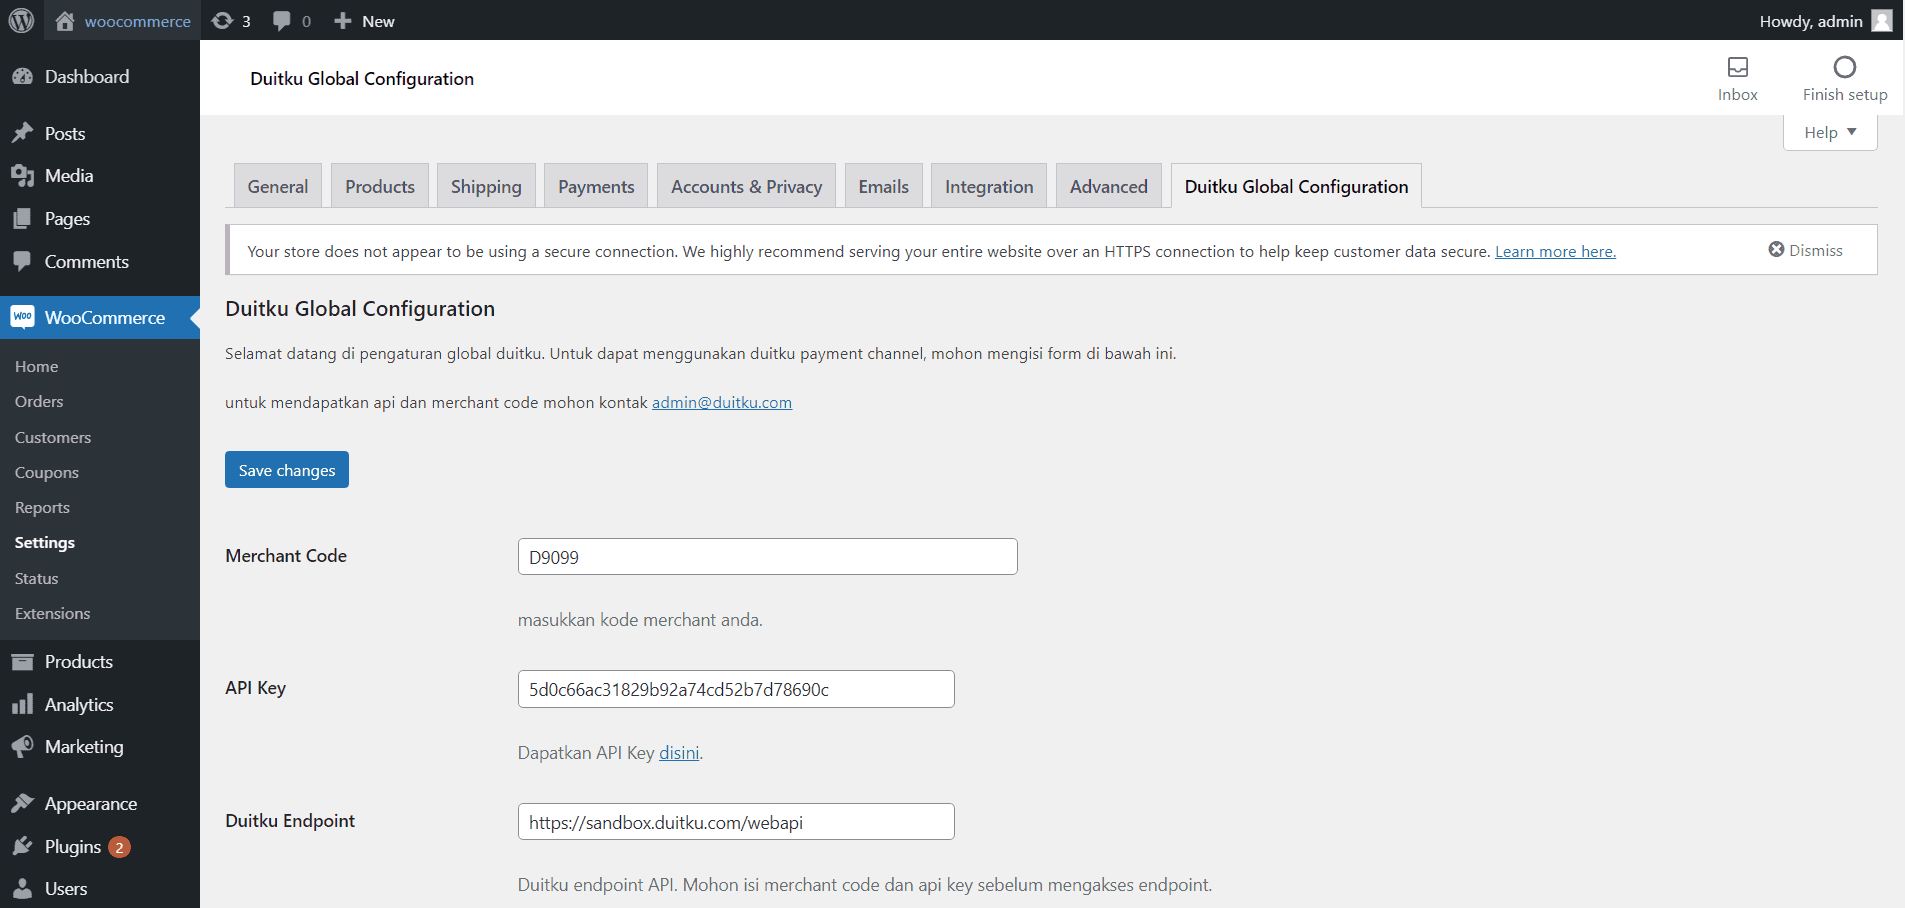
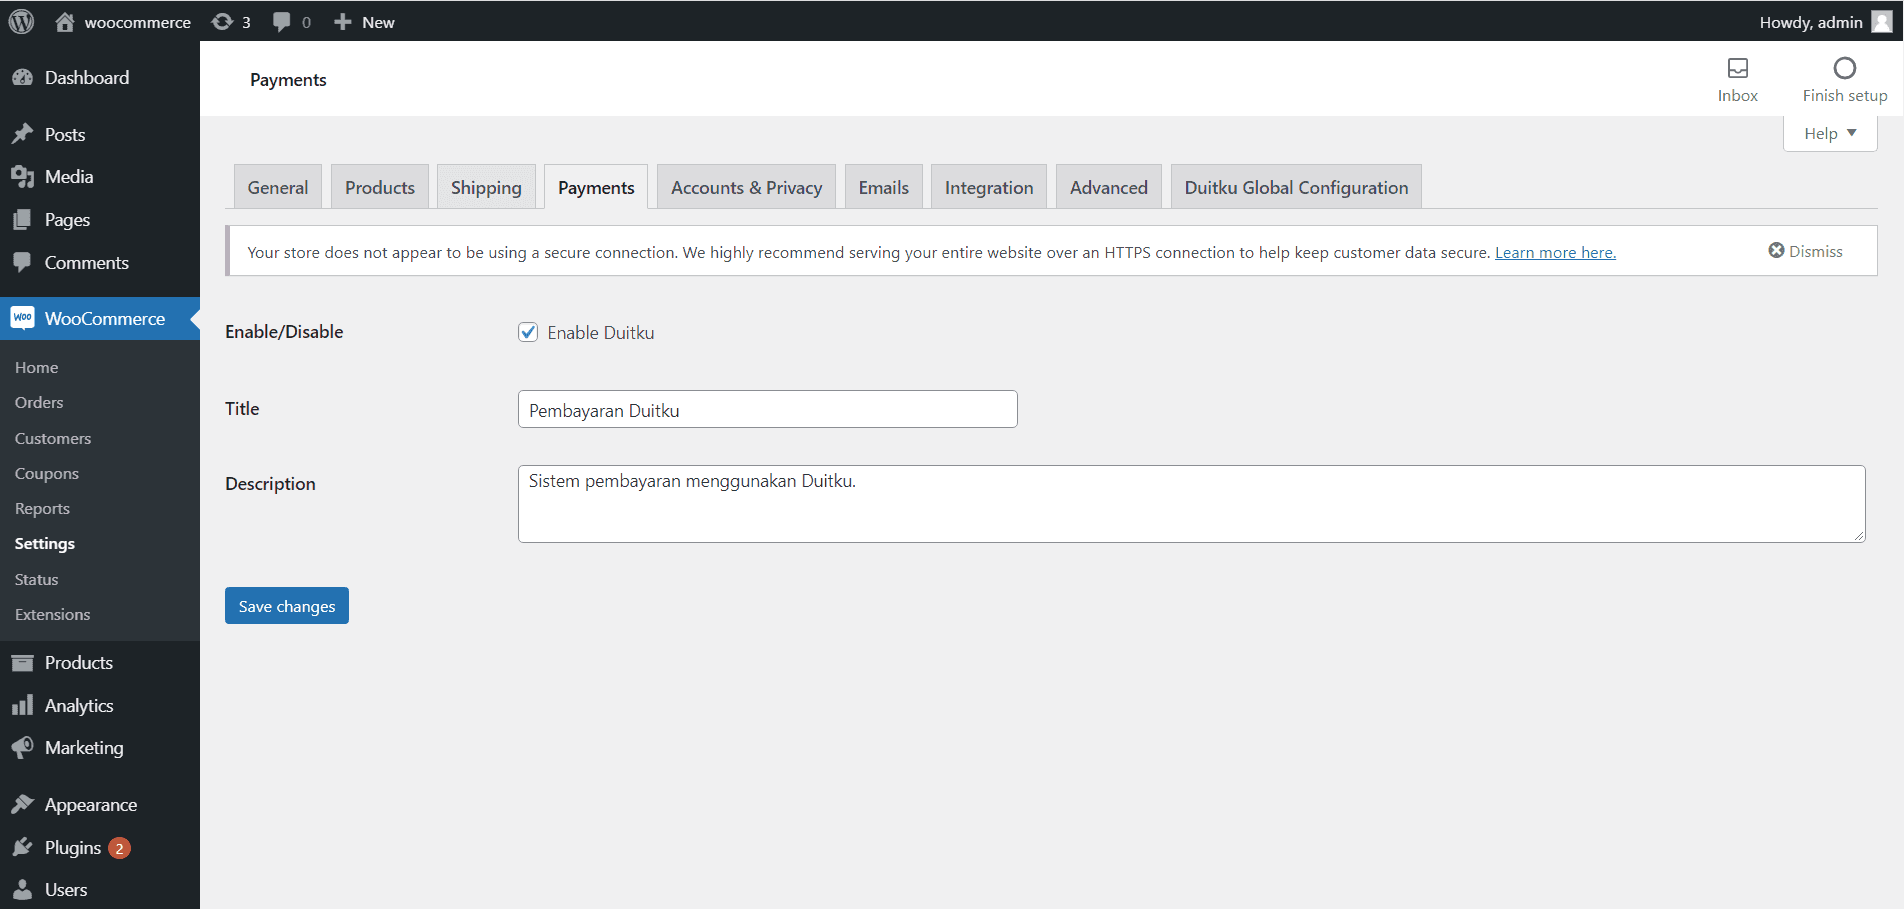
- After the 'Duitku Global Configuration' setting is complete, open the Payment tab.
- Select the payment channel that you will use (example: Duitku Mandiri, Duitku CIMB, Duitku Wallet, Duitku Credit Card, Duitku BCA).
- Here is an example of the payment channel on the Check Out Woocommerce page:On the Block Editor You'll see the checkout page like on below:
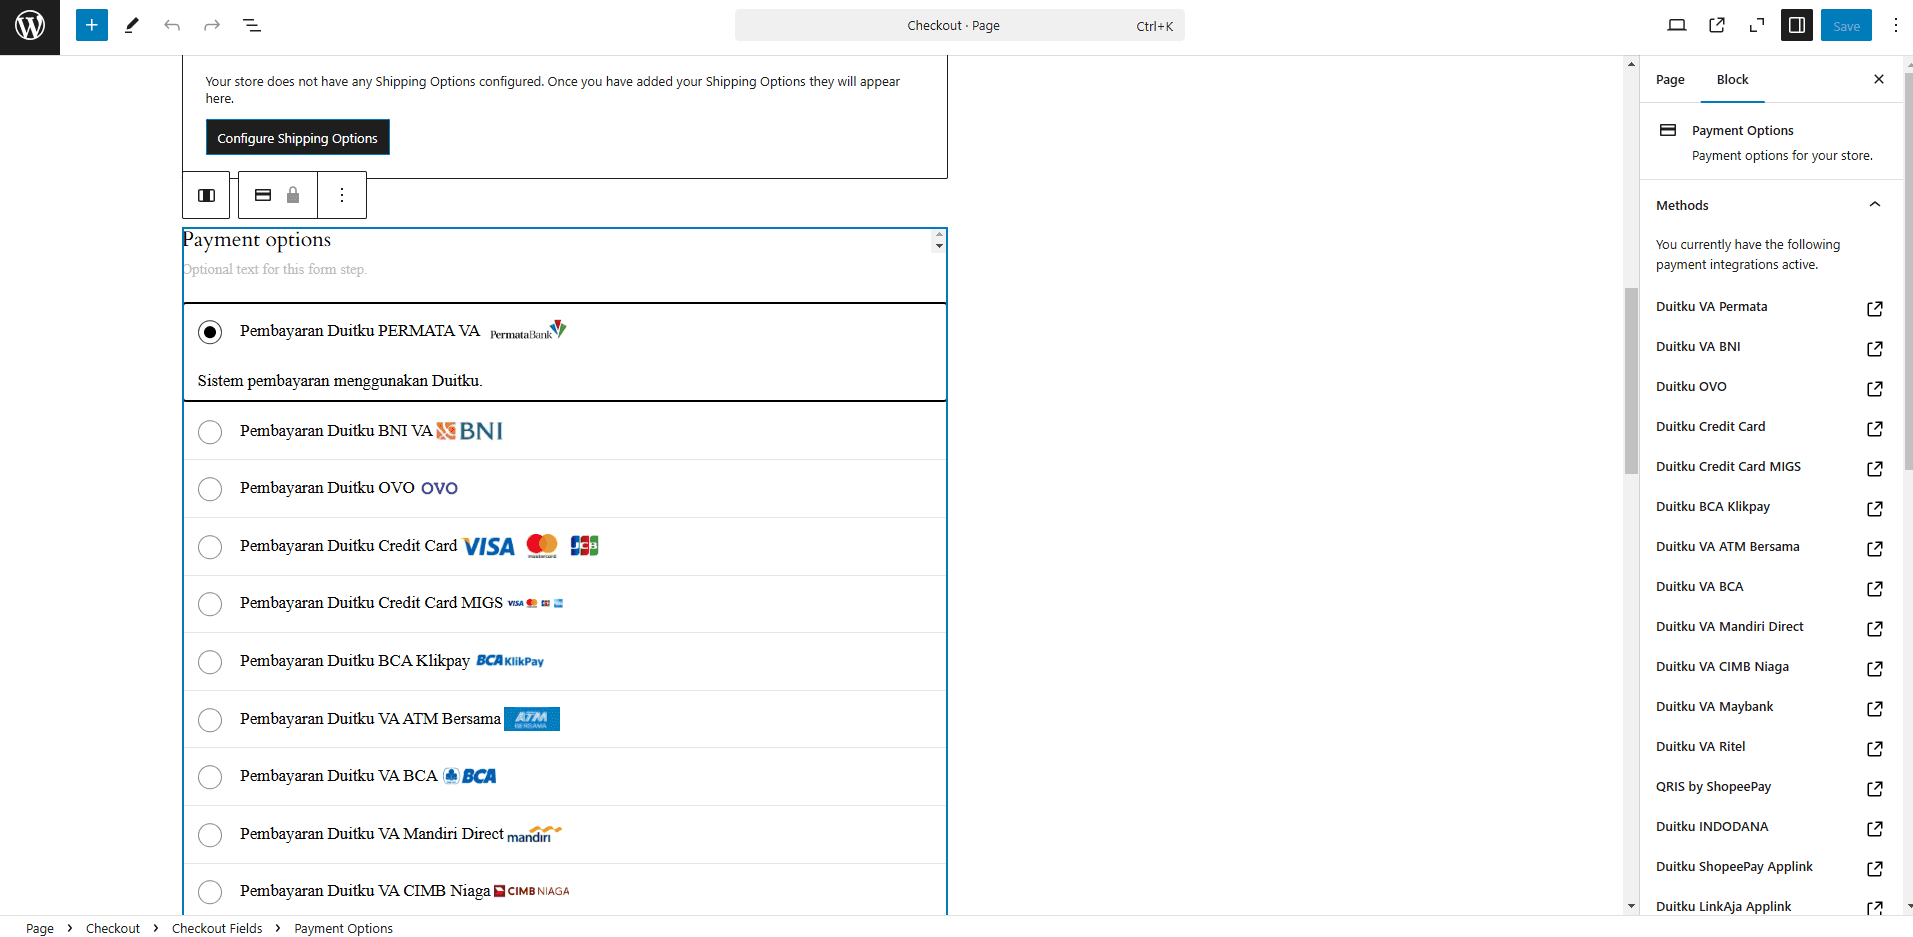
The below image is the example on the checkout page that will shown, It will follows as on Block Editor: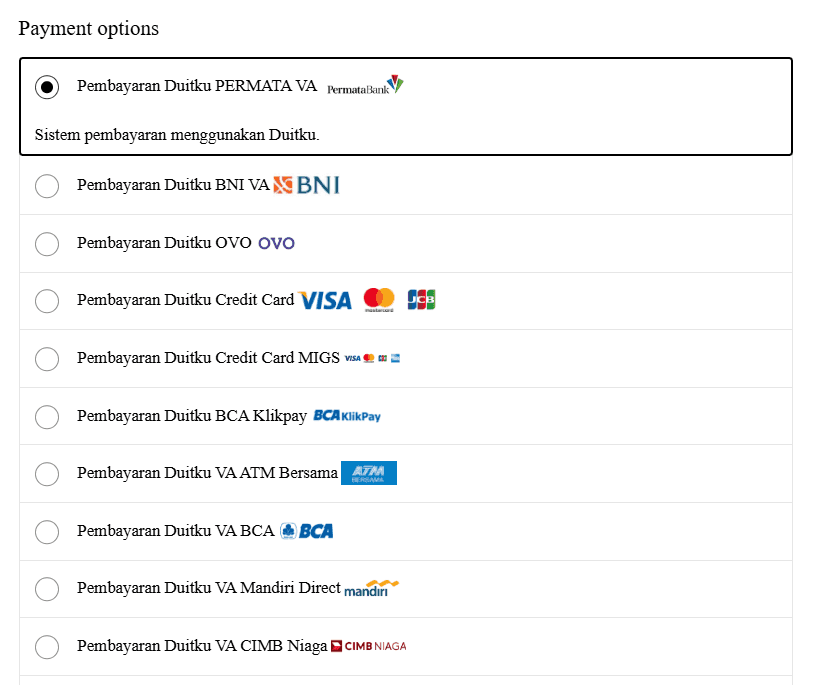
- Download the Duitku plugin for GiveWP.Download Here
- Open your Wordpress Admin menu (generally in
/wp-admin). - Open the Plugins menu ➜ Add New.

- Upload the Duitku plugin file (Make sure GiveWP is installed before adding the Duitku plugin).
- After the plugin is installed, Duitku will appear in the list of installed plugins. Open the Plugin ➜ Installled Plugins page, then activate the Duitku plugin.

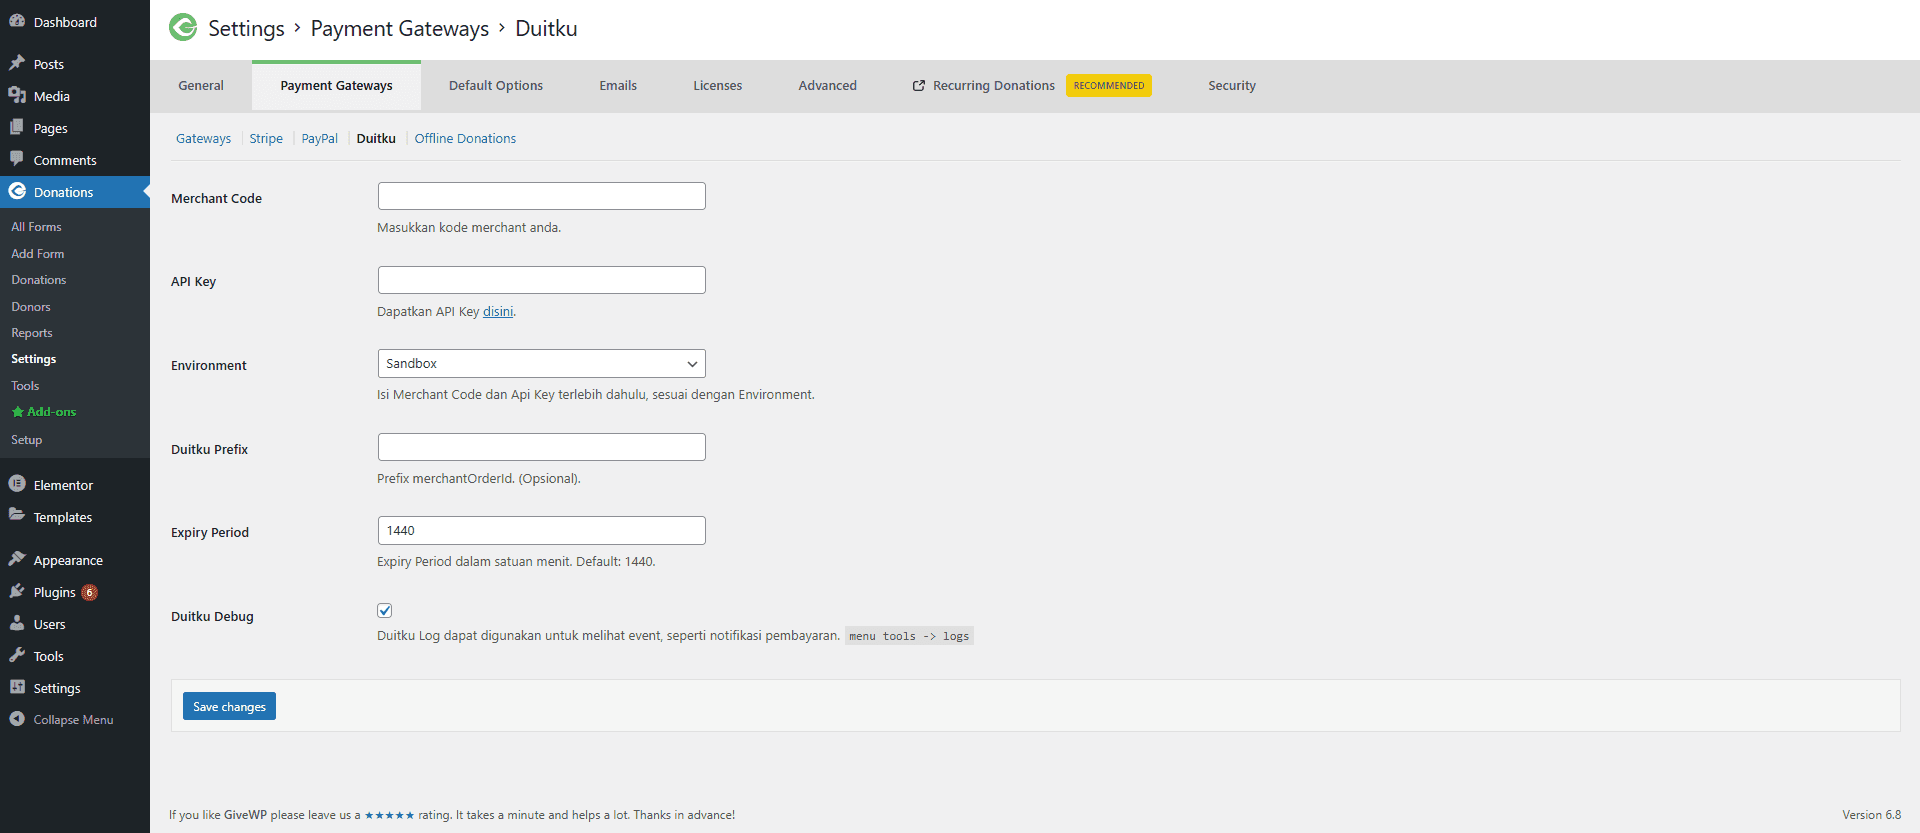
- Go to Donations ➜ Settings, then select the ‘Payment Gateways’ tab. Below that, you will see the link menu for Duitku. Click that menu to access Duitku settings.
- Enter the Merchant Code and API Key, which can be generated from your Duitku merchant dashboard under the project menu.
- After completing the Duitku settings, go to the Payment Gateways tab and click the Gateways menu.
- Choose the payment channels you want to use (e.g., Duitku Mandiri, Duitku CIMB, Duitku Wallet, Duitku Credit Card, Duitku BCA).

Below is an example of Duitku payment channels displayed on the donation page using GiveWP's Visual Form Builder: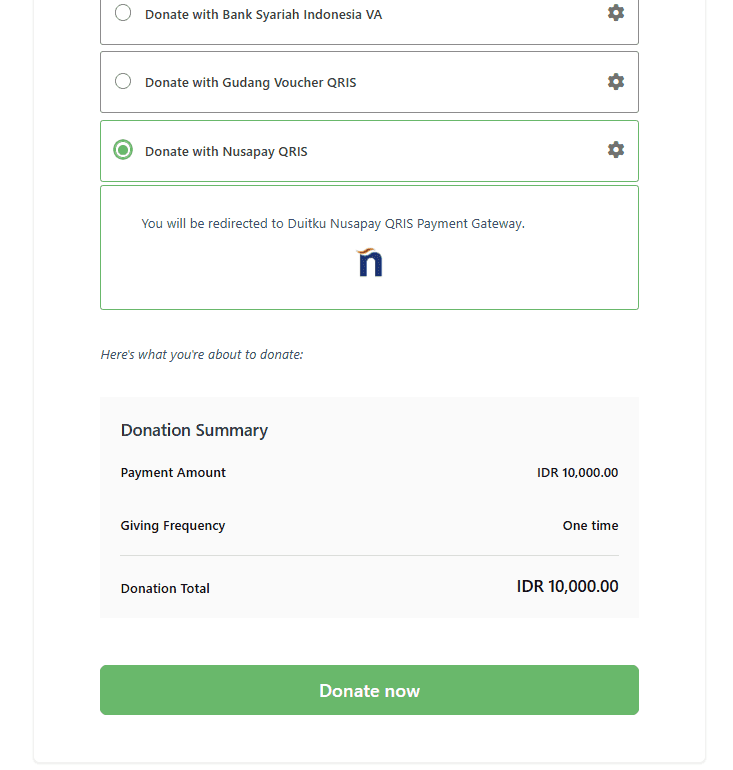
- Download the Duitku for Virtuemart pluginDownload Here
- Log in to the Joomla! Admin site.
- Make sure Virtuemart is installed on the Joomla! Site.
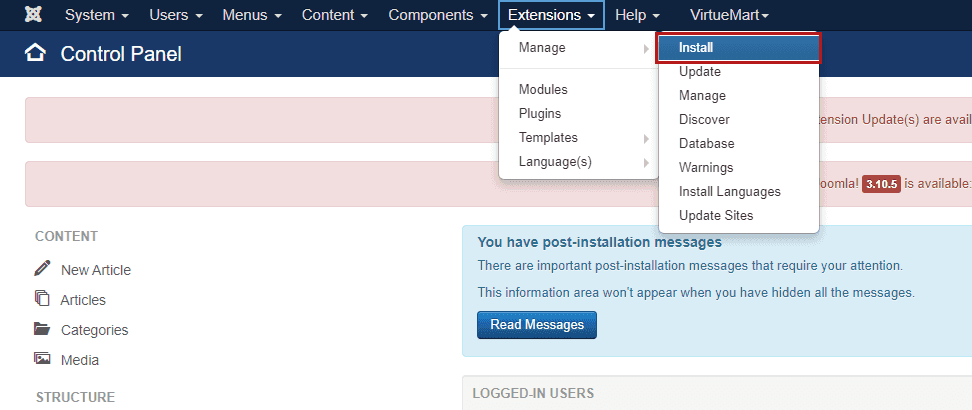
- Click the Extension menu, select the Manage menu, then click Install.
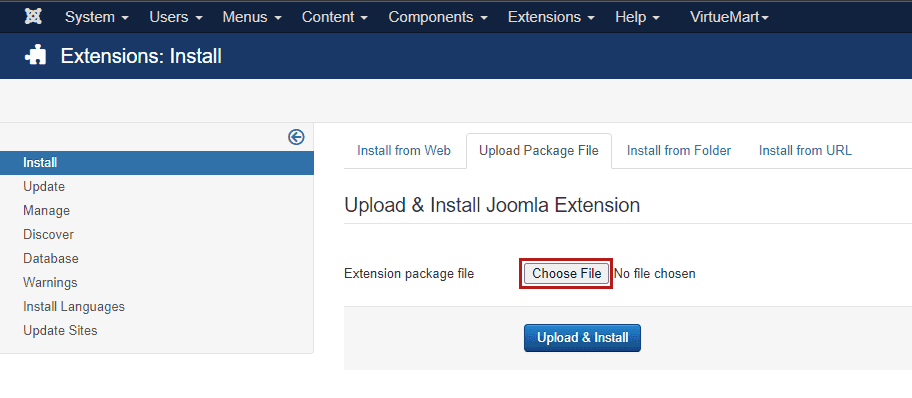
- Click the Choose File button next to the Extension Package File field.
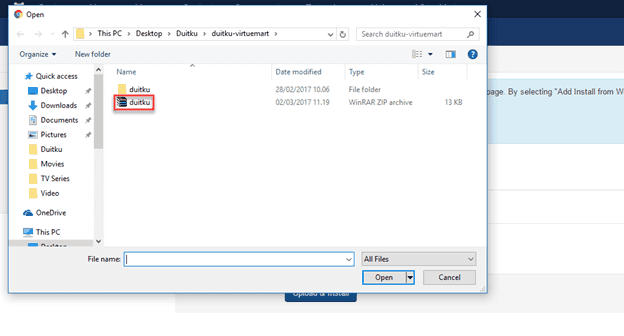
- Select the Virtuemart Duitku plugin file (.zip format) that you downloaded.
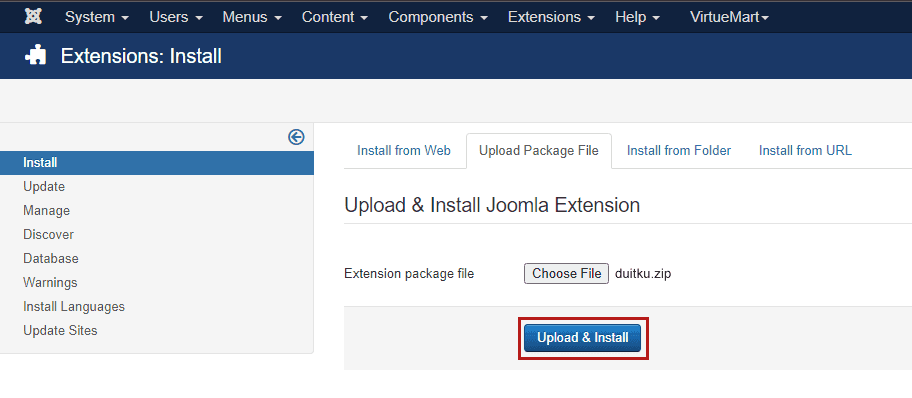
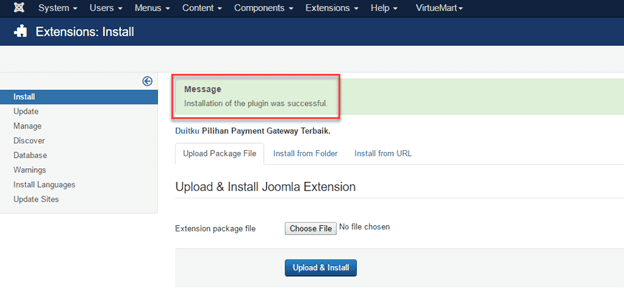
- Click the Upload & Install button.
- If successful, a message will appear on the successful installation of Joomla!.
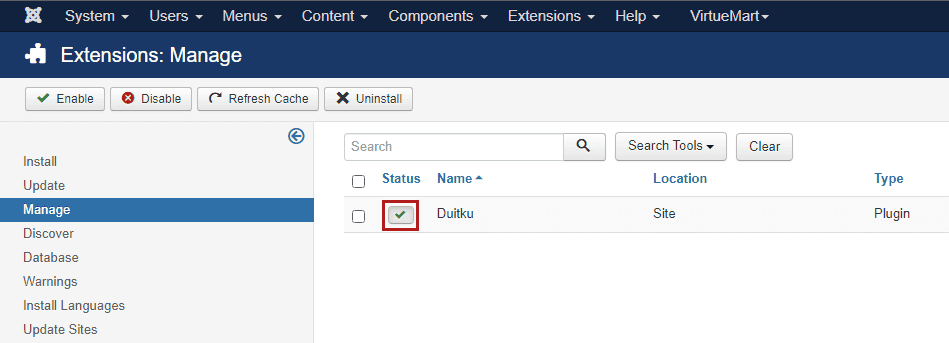
- After successfully installing the Duitku plugin, open the manage plugins menu in the Extension menu and then click Plugins, make sure the plugin is 'Enabled'. If the status is 'Disabled', click the green check button (Enable) in the status column.
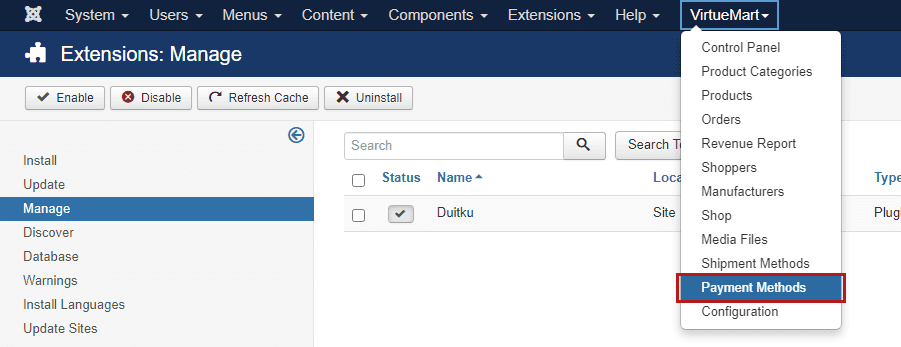
- Then register the Payment Method from Duitku by clicking the VirtueMart menu, then selecting the Payment Methods menu.
- In the Payment Methods menu, if the Payment Method from Duitku is not yet registered, click the New button to add a new Payment Method.

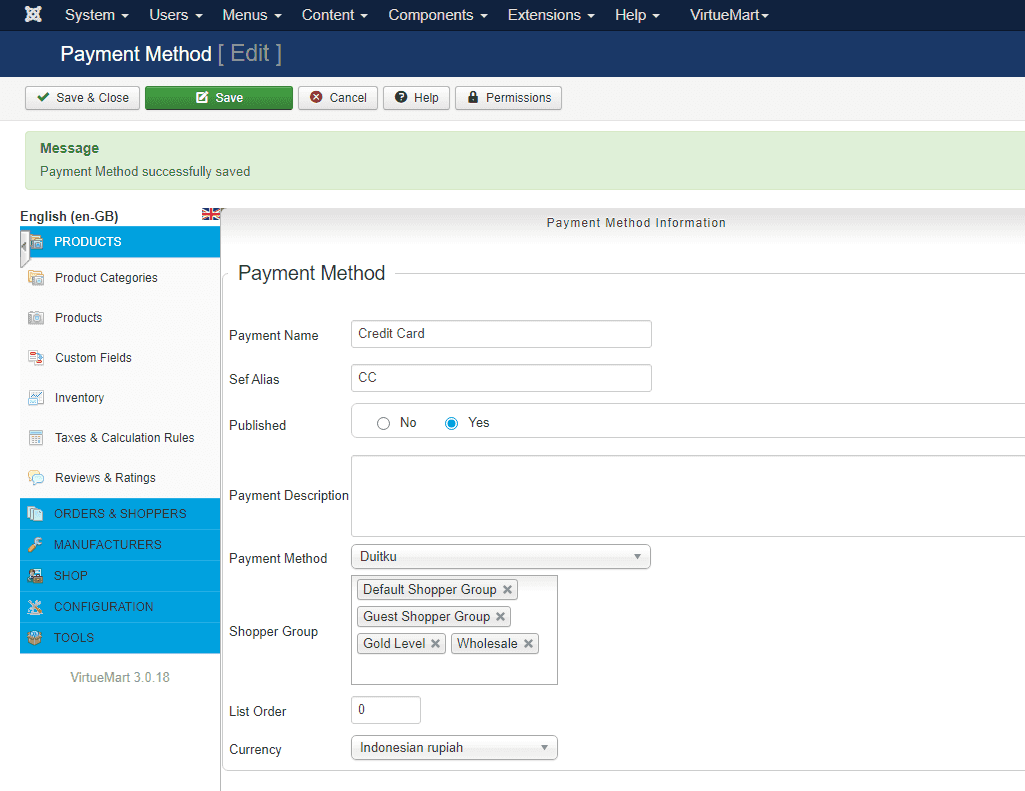
- On the Payment Method registration form, fill in the details of Payment Method Duitku.

Information :- Payment Name: Fill in the name of the Payment Method that you want to register. This Payment Name will appear in the payment method option during Checkout. Examples of Name Payment Method: Credit Card, Virtual Account, BCA, etc.
- Set Alias: Fill in the alias name of the Payment Method name. Not required
- Published: confirm the status Published in Yes
- Payment Description: fill in the additional information that will be displayed in the name of the Payment Method
- Payment Method: choose the type of Payment Method Duitku
- Group Shopper: not required
- Order List: not required
- Currency: choose Indonesian Rupiah
When it has finished filling, click the Save button
- If charging and storage is successful, Joomla! will display a successful storage message.
- After successfully storing the Payment Method data, select the Configuration tab on the Payment Method registration form.
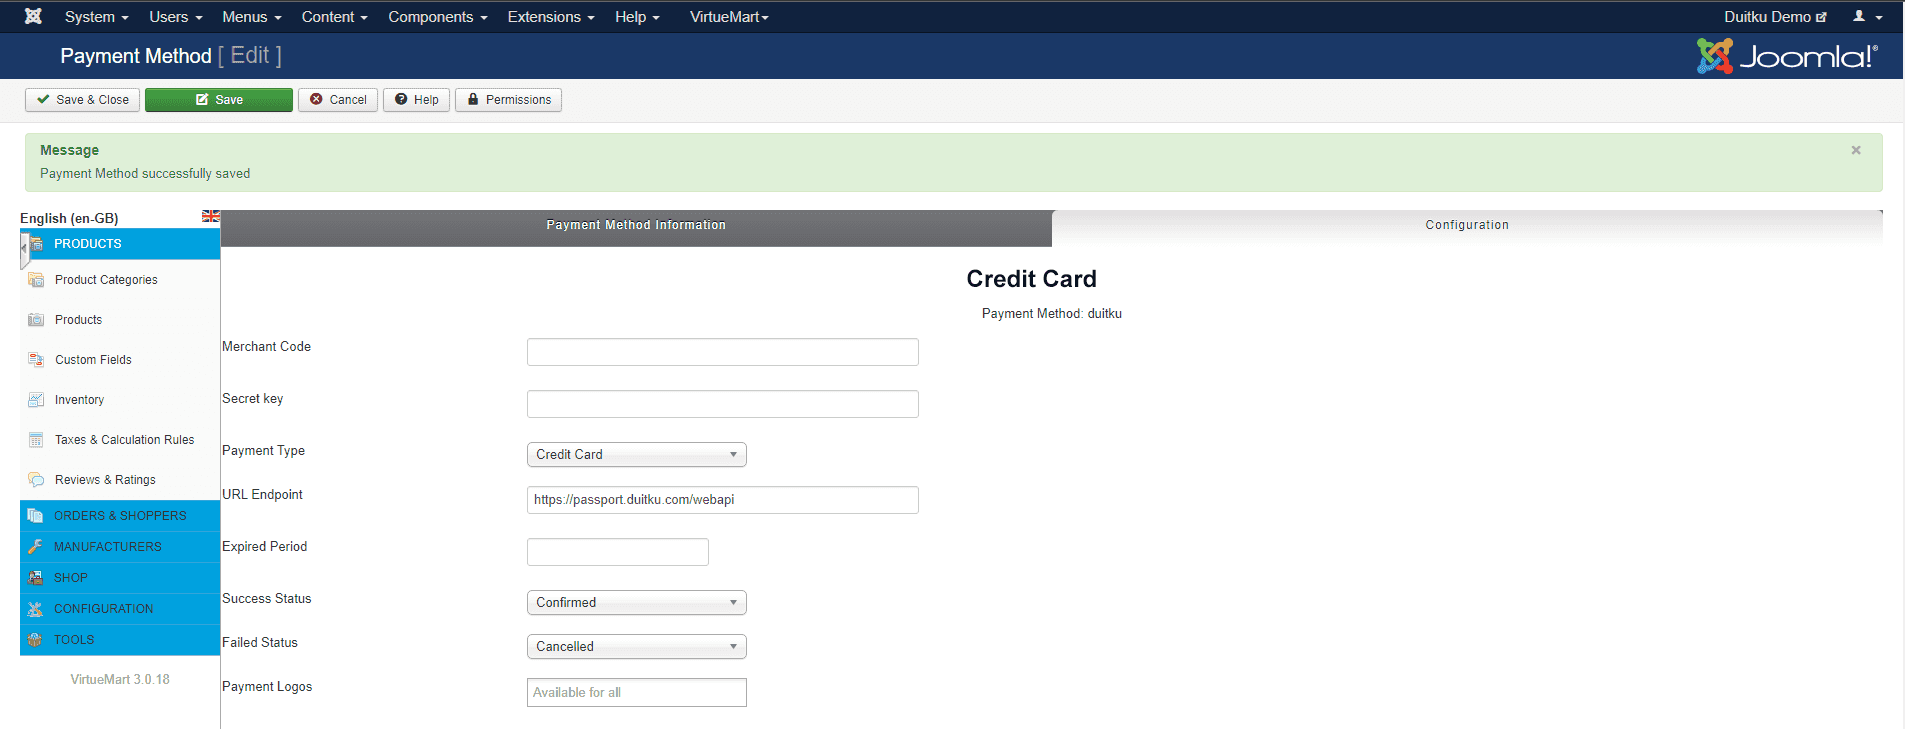
Information :- Merchant Code: enter your Merchant Code that you get from Project on the Duitku merchant page
- Secret Key: enter the Project API Key that you got from Project on the Duitku merchant page
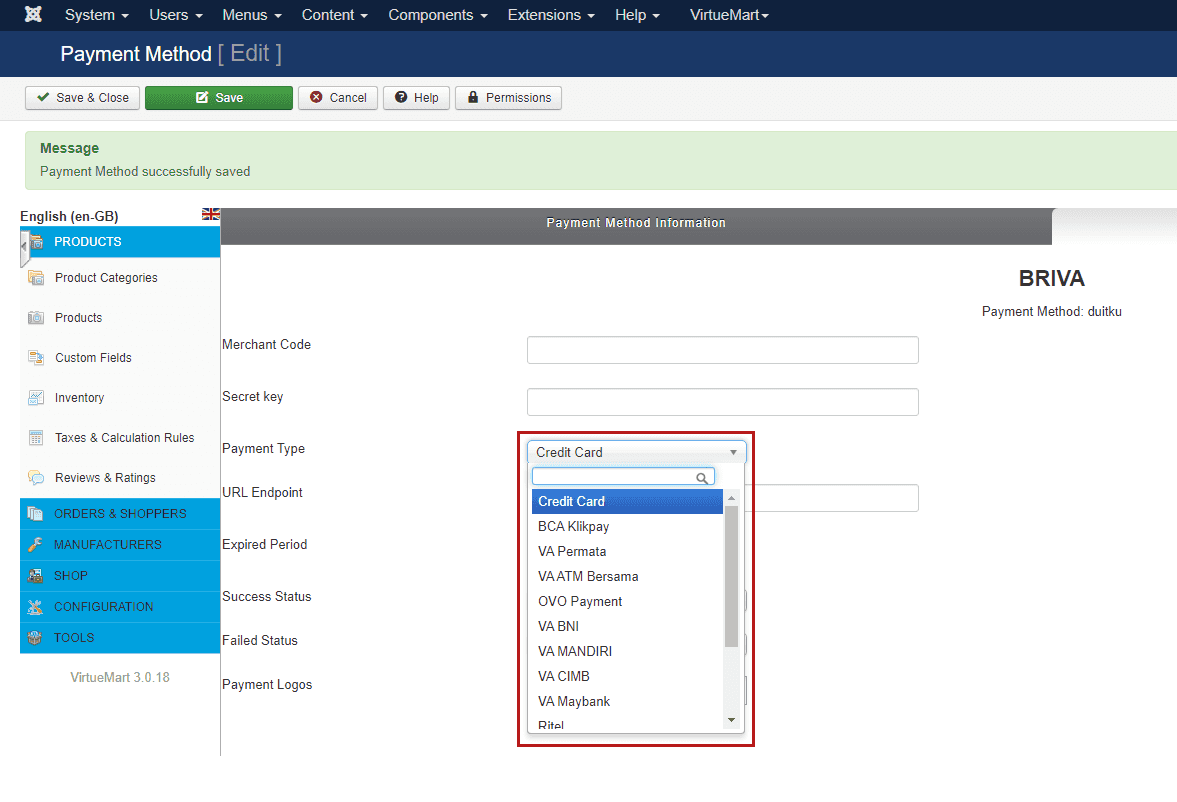
- Payment Type: select the type of Payment Method that you want to register in accordance with the payment channel in Duitku
- Endpoint URL: If integration is still in the development stage, use this address
https://sandbox.duitku.com/webapi - Endpoint URL: If the integration is in production stage, use this address
https://passport.duitku.com/webapi - Success Status: no need to change, make sure it contains Confirmed
- Group Shopper: not required
- Failed Status: no need to change, make sure it is Canceled
- Payment Logos: no need to be filled
If you have finished filling in the data, click the Save or Save & Close button. Joomla! will display the message Payment Method successfully
- You can see the Payment Method that you listed on the Payment Method list.
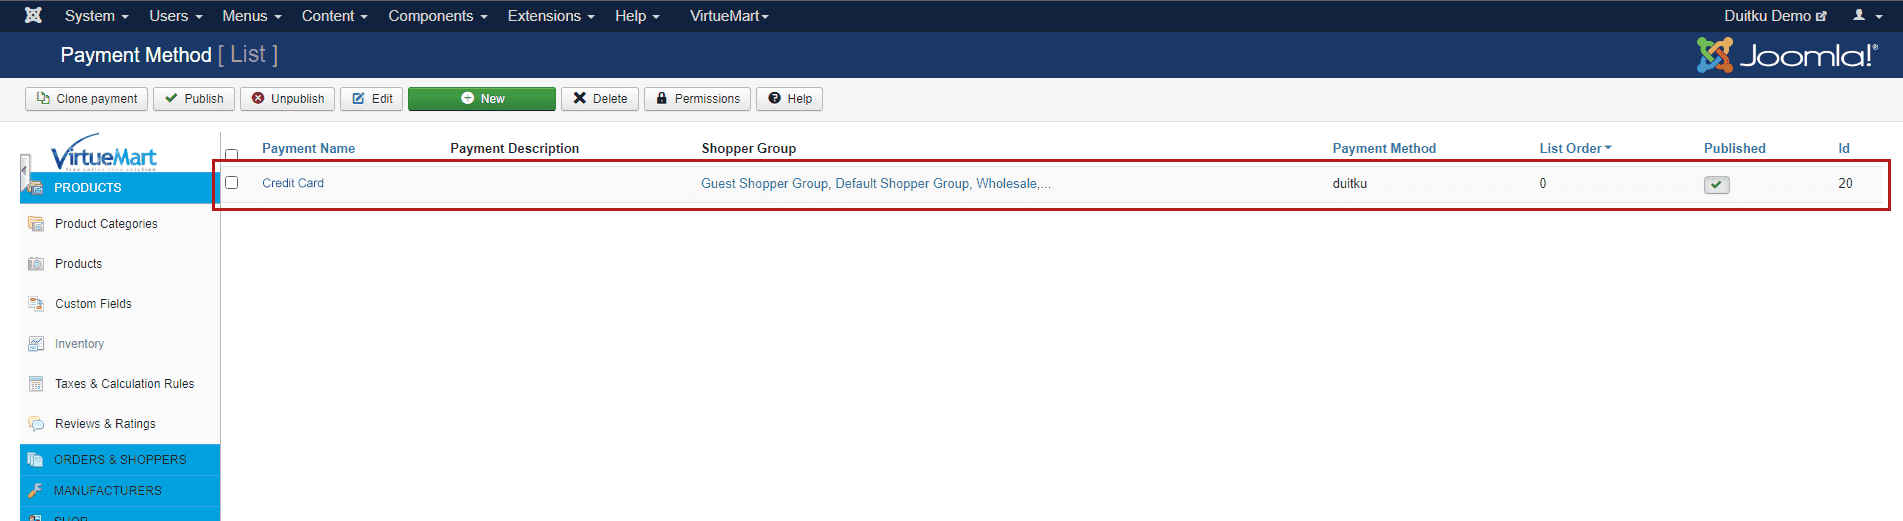
- A similar configuration must be set for each of the Duitku payment channel options (such as: CIMBclicks, BCA, etc.).
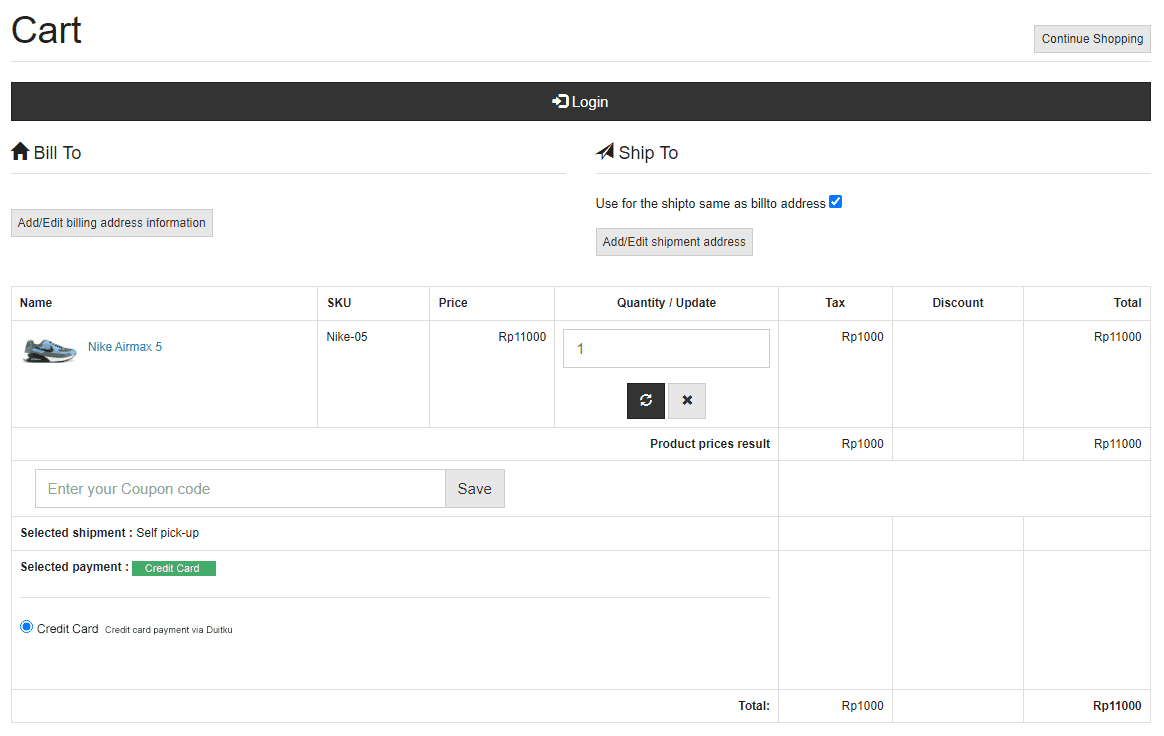
- You can see the Payment Method that you registered on the checkout page on your site.
- Congratulations on successfully installing the Duitku plugin on your VirtueMart based site. If there are difficulties or further questions, please contact us on Live Chat or email at [email protected].
- Download the Duitku plugin for Opencart.
- Extract the downloaded file.
Information :- Opencart15 is used for Opencart version 1.5.x.xDownload Here
- Opencart20 is used for Opencart version 2.0.x.xDownload Here
- Opencart23 is used for Opencart version 2.3.x.xDownload Here
- Opencart30 is used for Opencart version 3.0.x.xDownload Here
- Open the Opencart root folder (Opencart installation folder) you use the FTP client then upload the Admin folder, Catalog and System.
- Open your Opencart Admin (generally in /admin) then open the Payment page.
The first image is a display for Opencart Version 1.5 & 2.0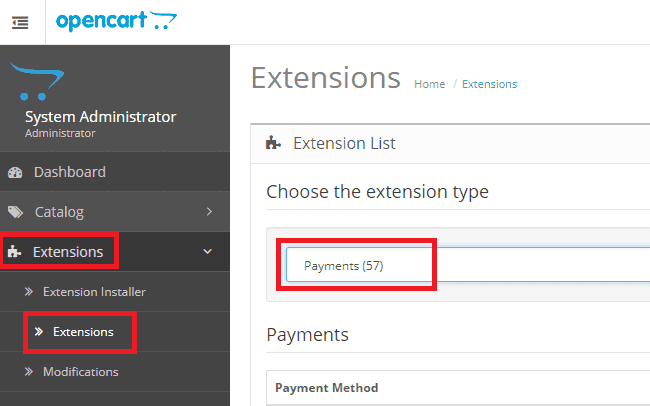
The second image is a display for Opencart Version 2.3 & 3.0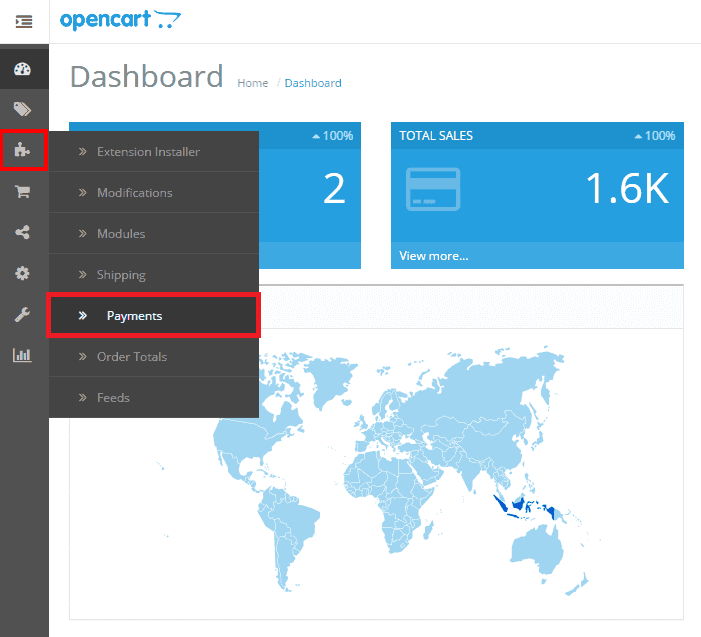
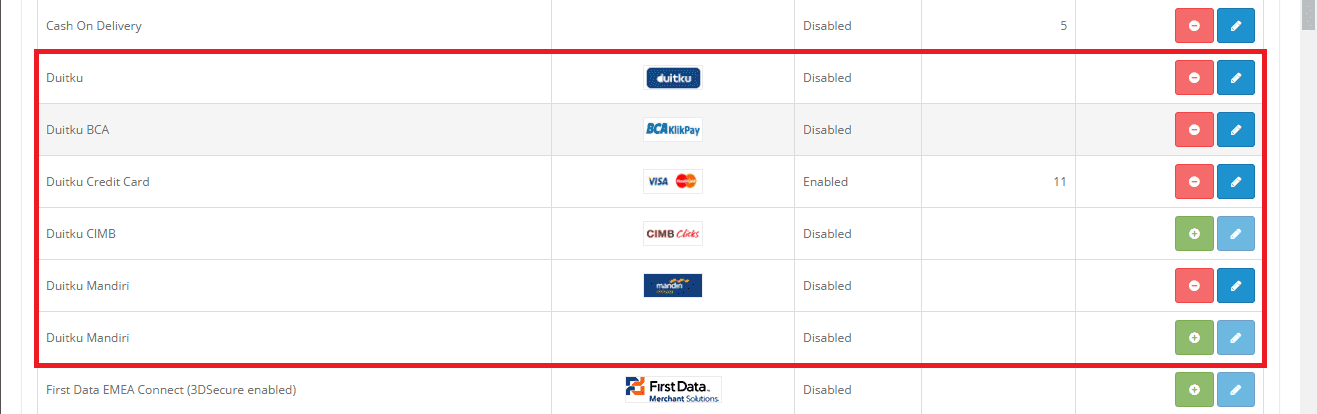
- After the plugin is installed, the Duitku option will appear in the payment channel option.
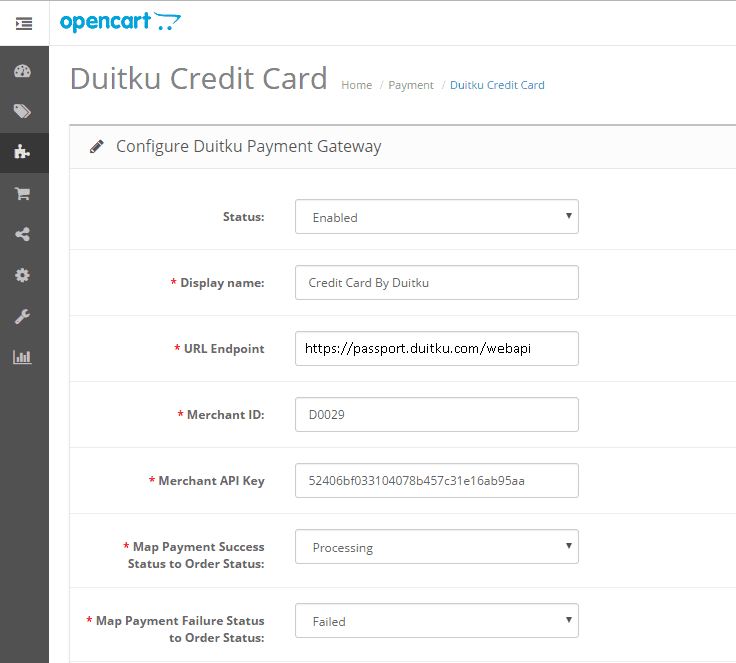
- Open the configuration page and enter the Merchant Code, API Key and other required parameters. These parameters are created on the Duitku merchant page in the Project menu section.
Endpoint URL:- If integration is still in the development stage, use this address
https://sandbox.duitku.com/webapi - If the integration is in production stage, use this address
https://passport.duitku.com/webapi
- If integration is still in the development stage, use this address
- A similar configuration must be set for each of the Duitku payment channel options (such as: CIMBclicks, BCA, etc.).
- Make sure the main currency used is IDR
- After the payment channel is activated, the choice will appear on the front page of your site like the example below:

- Download the Duitku plugin for Opencart.
- Download the Duitku plugin for WHMCS.Download Here
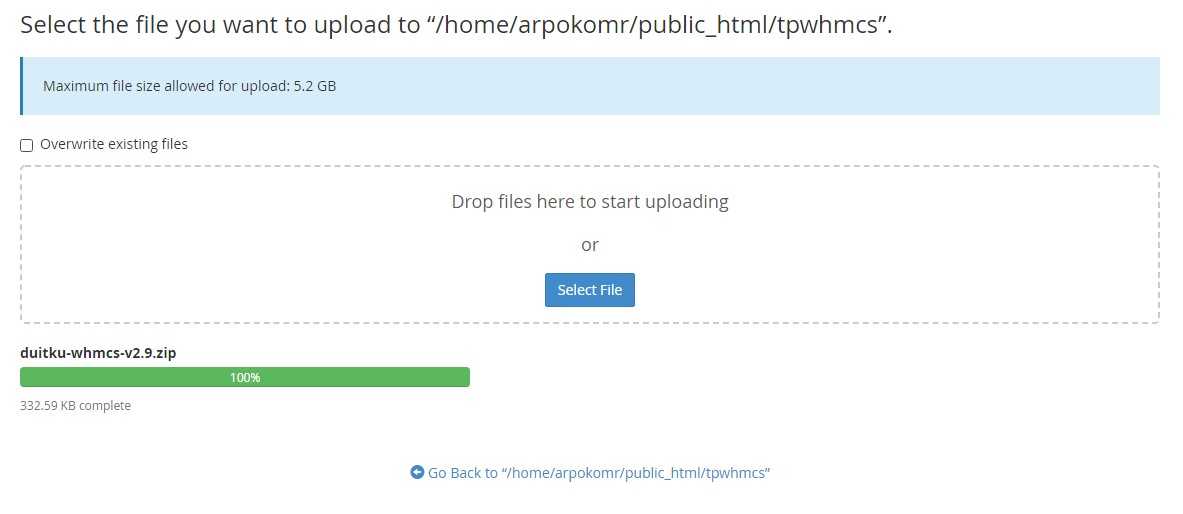
- Go to your hosting file manager then to your WHMCS installation folder/directory.
- Upload the previously downloaded plugin file.
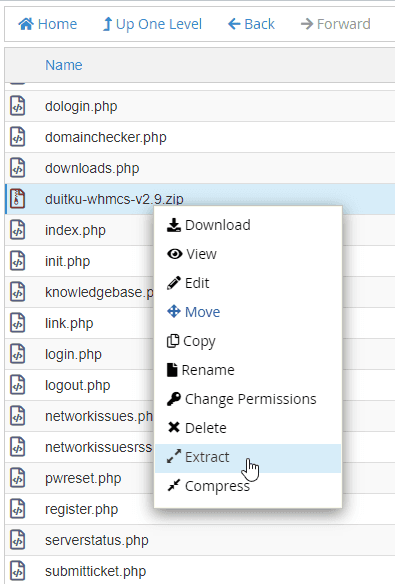
- After successfully uploading the plugin file, right click on the plugin file and select Extract.
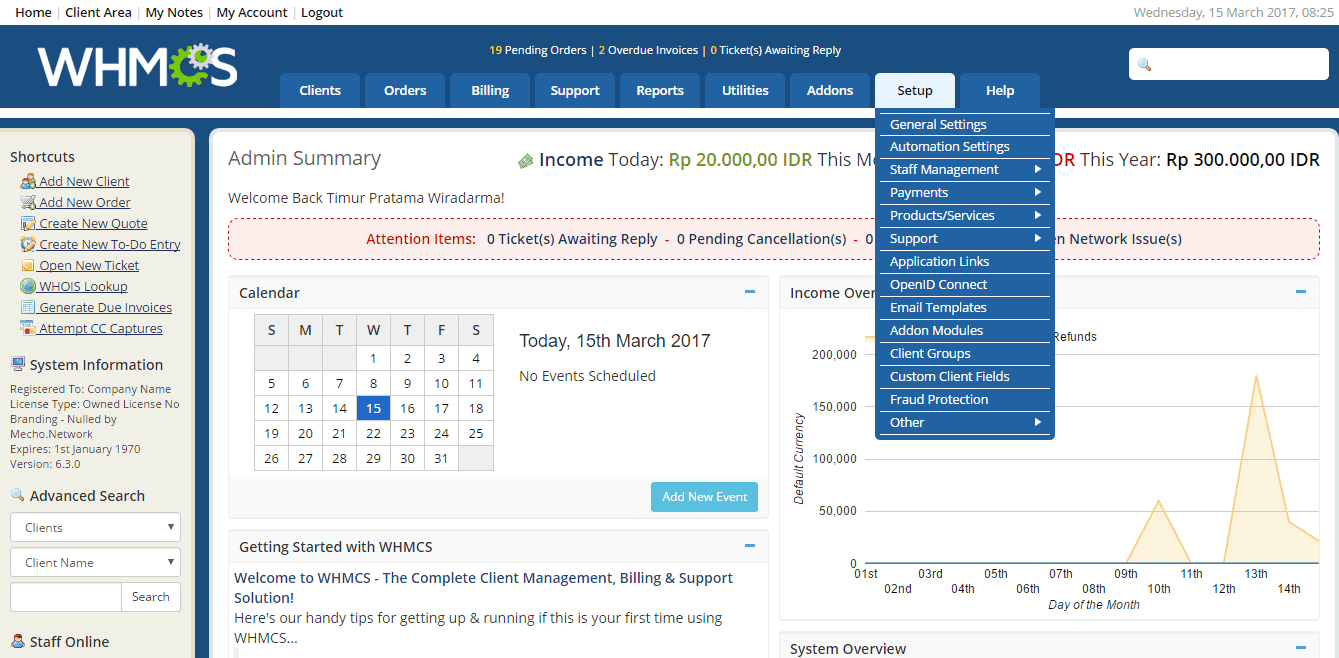
Note: For more explanation to add a payment gateway to WHMCS, you can see the documentation for installation and activation of the WHMCS payment gateway. - After the upload process is complete, login to your WHMCS admin.
- On your WHMCS admin page, click the Setup menu, point the cursor to the Payments submenu and select Payment Gateways.
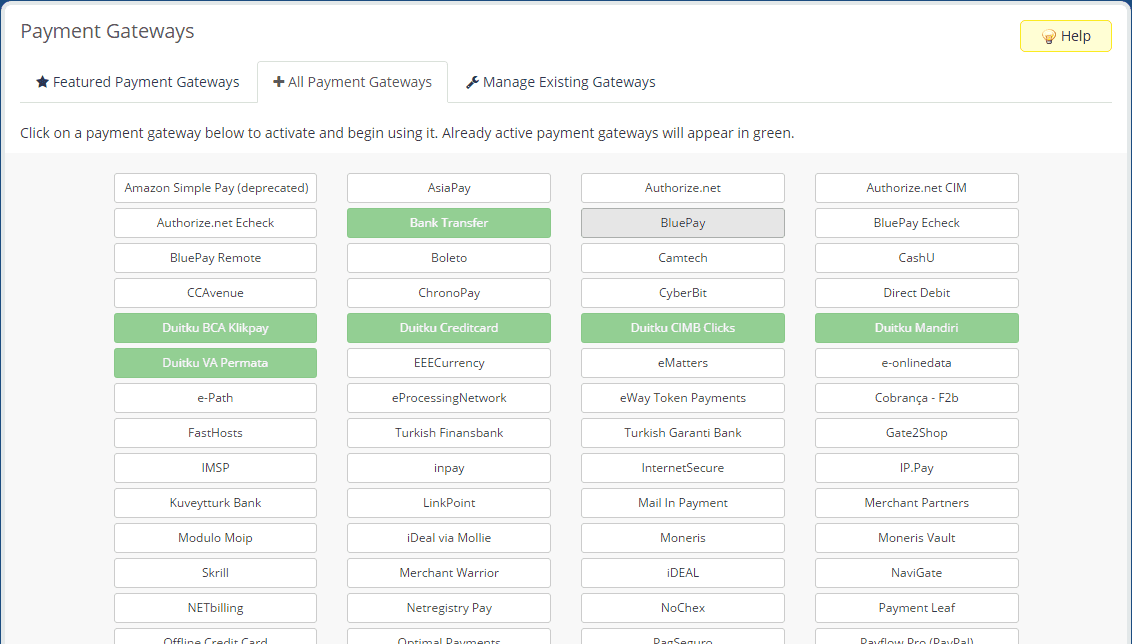
- On the Payment Gateways page, click the All Payment Gateways tab, then click on my BCA Cash Klikpay, Duitku CreditCard, Duitku CIMB Clicks, Duitku Mandiri, Duitku VA Permata, or my payment gateway Duit module that you want to activate.
- If the payment gateway has turned green, then the payment gateway has been activated.
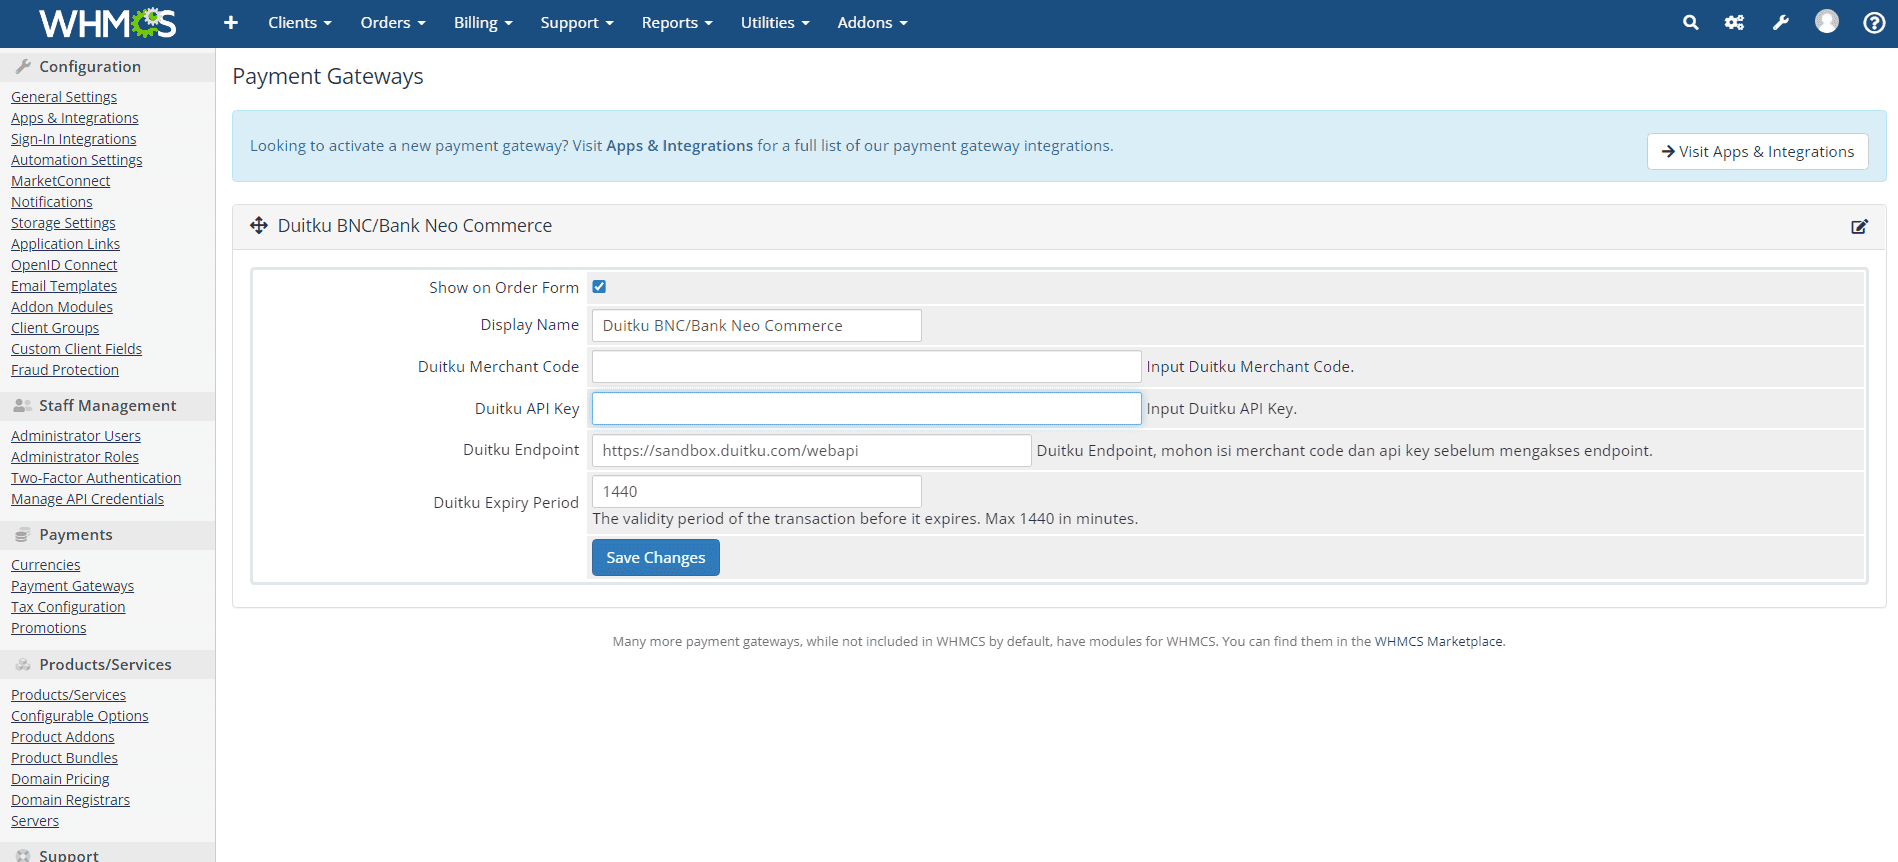
- After the payment gateway is activated, click the Manage Existing Gateway tab.
- A configuration display for the payment gateway that you activate will appear, if the payment gateway that you have activated has not yet appeared, please refresh on the Payment Gateways page.
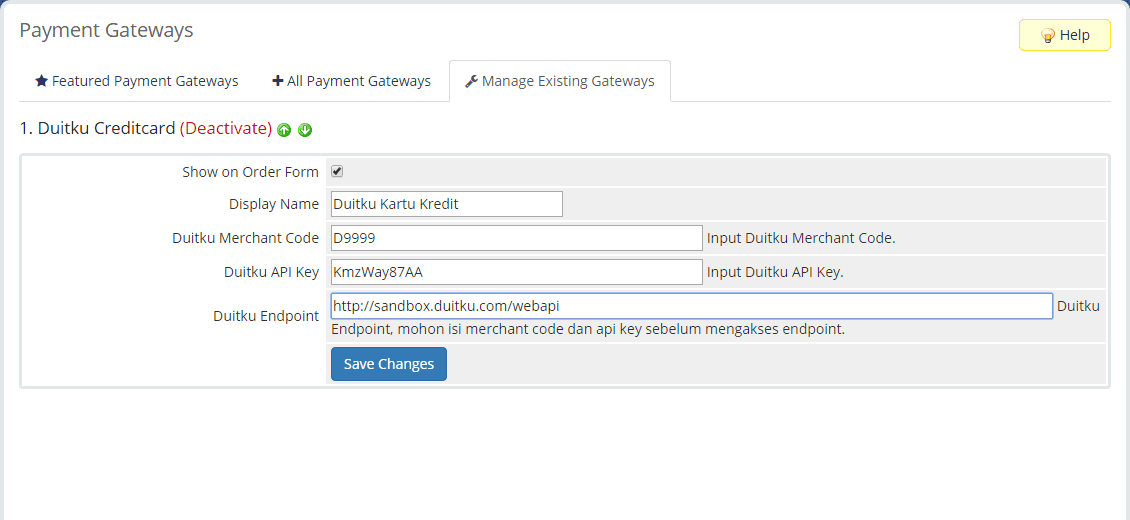
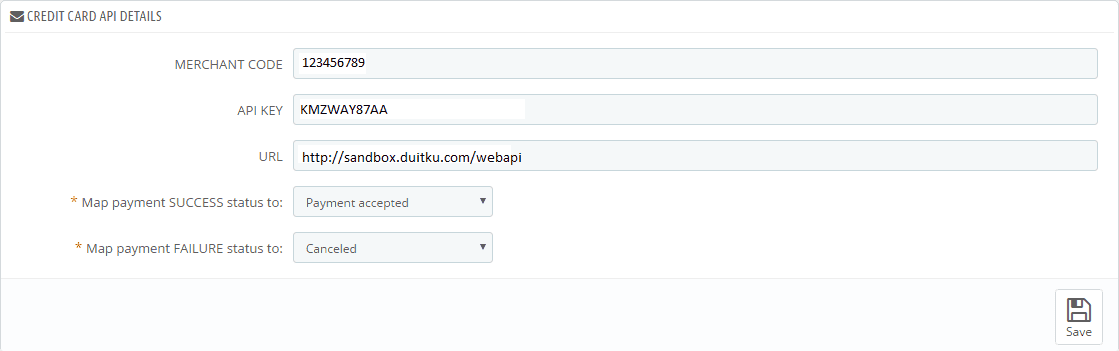
Information :- Duitku Merchant Code: enter your Merchant Code that you get from Project on the Duitku merchant page
- Duitku API Key: enter the Project API Key that you got from Project on the Duitku merchant page
- Duitku Endpoint: If integration is still in the development stage, use this address https://sandbox.duitku.com/webapi
- Duitku Endpoint: If the integration is in production stage, use this address https://passport.duitku.com/webapi
- After completing the configuration form, click Save Changes, then repeat the payment gateway for other Duitku
- Congratulations on successfully installing the Duitku plugin on your WHMCS-based site. If there are difficulties or further questions, please contact us on Live Chat or email at [email protected]
- Duitku plugin installation for Magento
Magento 2.3 Magento 2.4 Download Duitku plugin for Magento 2.3.x.xDownload Here *to download older version you can download Magento 1.9.x.x or Magento 2.x.x.x
Use Composer to install the plugin composer require duitku_payment_gateway/<package_name>Upload app folder to the Magento root folder (Magento installation folder) You could use FTP client.
(As default root folder is on SERVER_HOST/Magento). See to the picture below as example: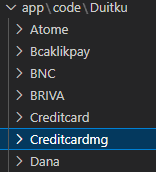
Package list for magento in composer that you can try (or see it on duitku_payment_gateway package list): duitku_bcaklikpayduitku_bncduitku_brivaduitku_creadit_cardduitku_creadit_card_mgduitku_danaduitku_indodanaduitku_indomaretduitku_link_aja_fixedduitku_link_aja_percentduitku_link_aja_qrisduitku_nobu_qrisduitku_ovoduitku_pospayduitku_shopeepay_qrisduitku_shopeepay_appduitku_va_atm_bersamaduitku_va_bcaduitku_va_bniduitku_va_cimbniagaduitku_va_mandiriduitku_va_maybankduitku_va_permataduitku_ritelduitku_jeniuspayduitku_va_sampoernaduitku_va_danamonduitku_va_bsi
- Check the plugin is installed or not. Run this command:
bin/magento module:status - Make sure the plugin on the modules enable list. If the module haven't in the list run this command to activate:
bin/magento module:enable <nama_module> - Then, run this command:
- Execute upgrade script :
bin/magento setup:upgrade - Deploy magento :
bin/magento setup:static-content:deploy -f - Clean cache storage :
bin/magento cache:clean
Notes: If you do have a previous version installed and upgrade the plugins to the latest version. After upgrade our plugins, You need to run
bin/magento setup:upgrade --keep-generated,bin/magento setup:static-content:deployand clean cachebin/magento cache:clean. - Execute upgrade script :
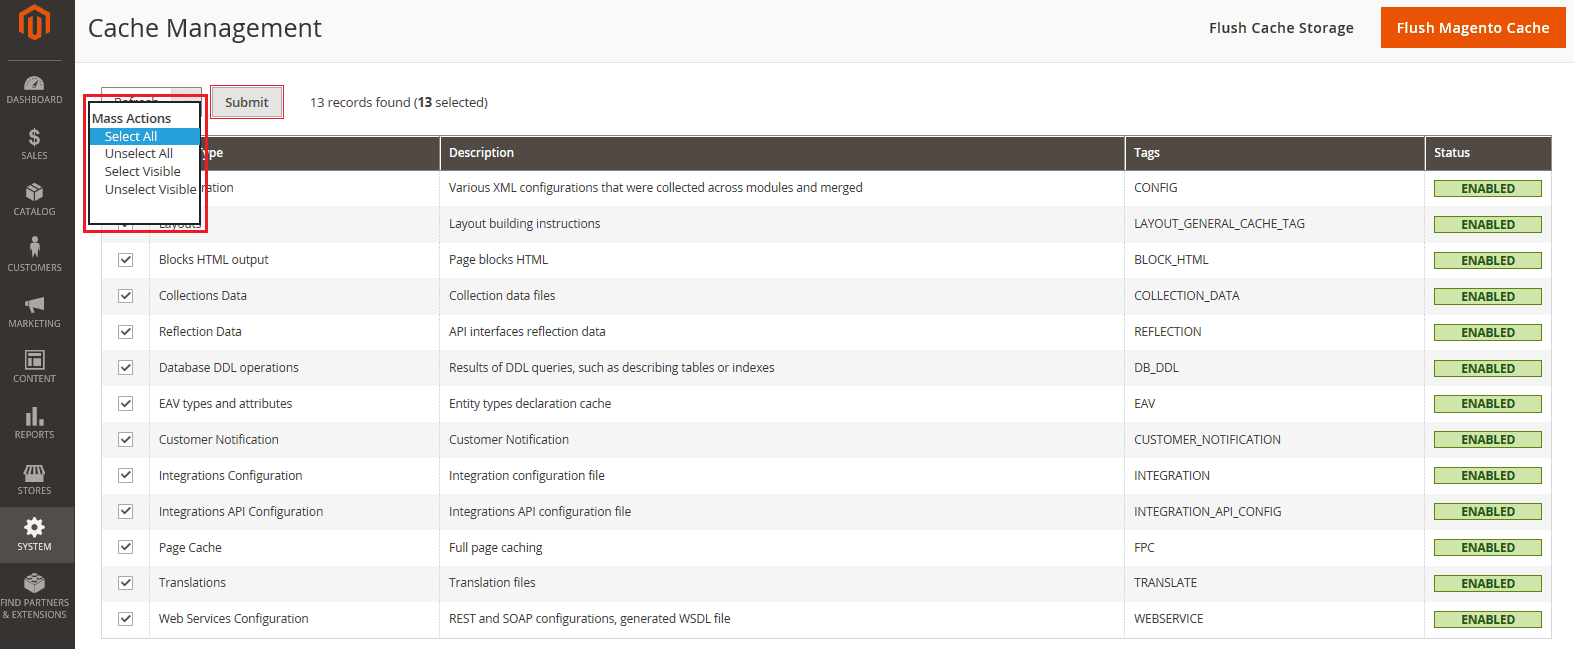
- Open the Admin Panel menu (generally in /admin). On the System menu, select Cache Management in your Magento admin.
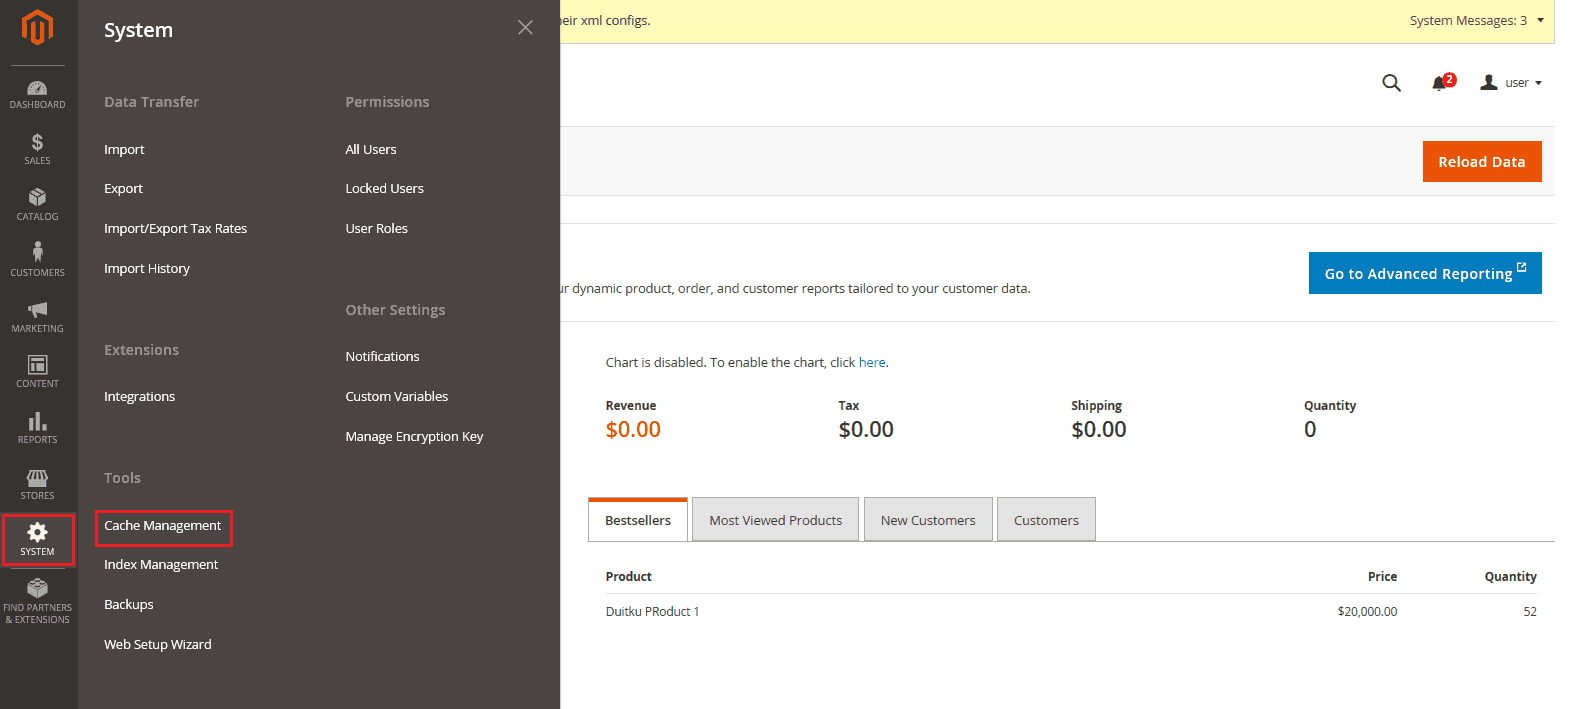
- Update the entire cache, select 'All' then send (submit).
- Open the Admin Panel menu. In the Stores menu select Configuration.
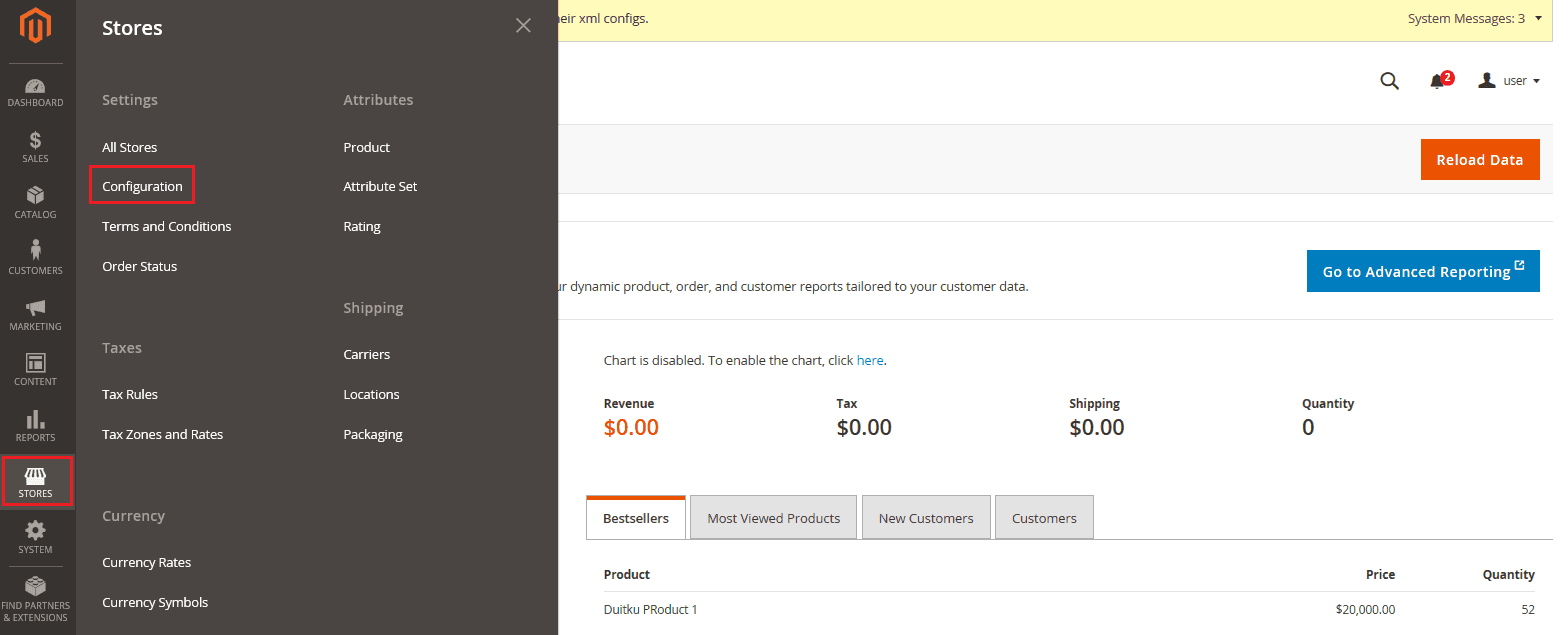
- In the Sales section, select the Payment Method menu.
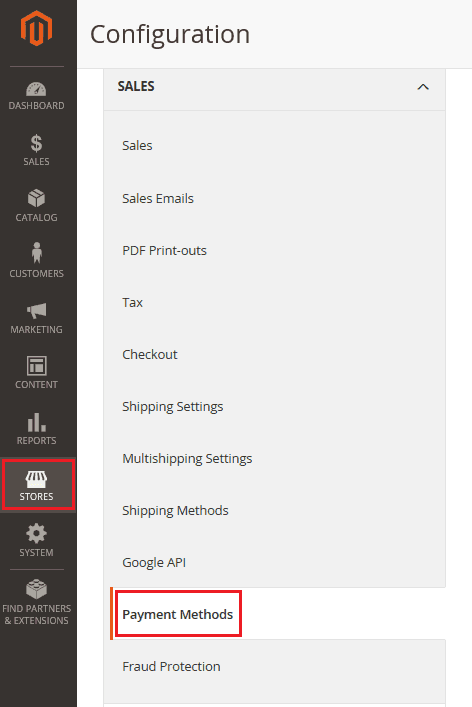
- In the Other Payment Methods section, click on an installed payment method to expand the basic settings and fill in the following fields:
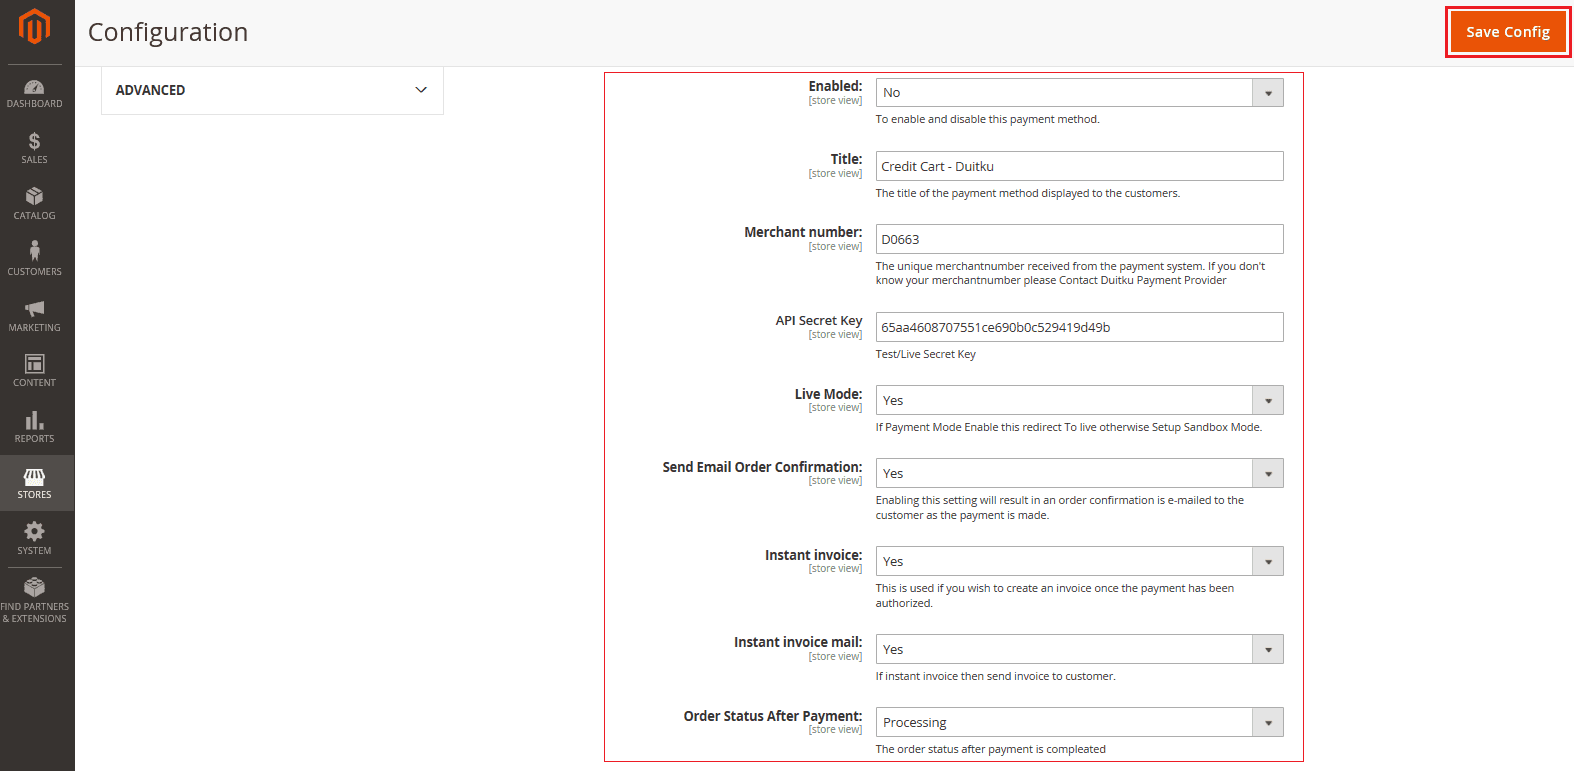
Field Description Enabled To enable and disable this payment method. Title The title of the payment method displayed to the customers. Merchant number The unique merchantnumber received from the payment system. You might see your merchant number on dashboard. API Secret Key Used as an API key to be used for authorization sandbox or passport environment on API request. Live Mode If Payment Mode Enable this redirect To live otherwise Setup Sandbox Mode.
- Duitku plugin installation for Magento
- Download the Duitku plugin for JoomShopping.Download Here
- Extract the file you downloaded.
- Using your FTP application, copy the extracted file to the \components\com_jshopping\payments folder in your Joomla installation directory.
- After the copy process is complete, log in to your Joomla admin.
- On the Joomla admin page, select the component menu, then select the joomshopping menu then select the Option menu.
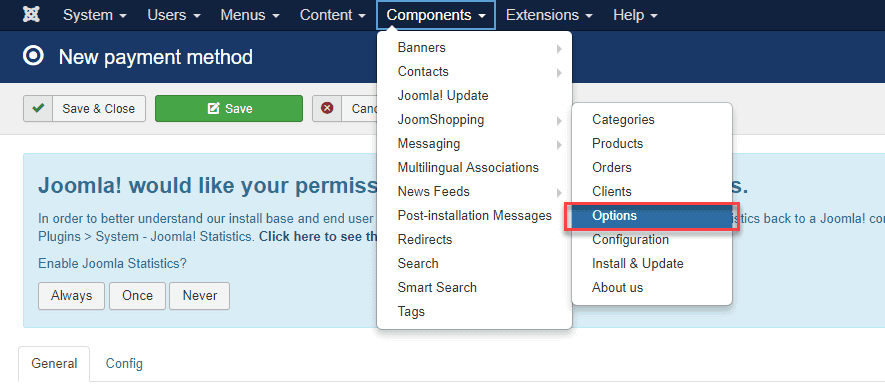
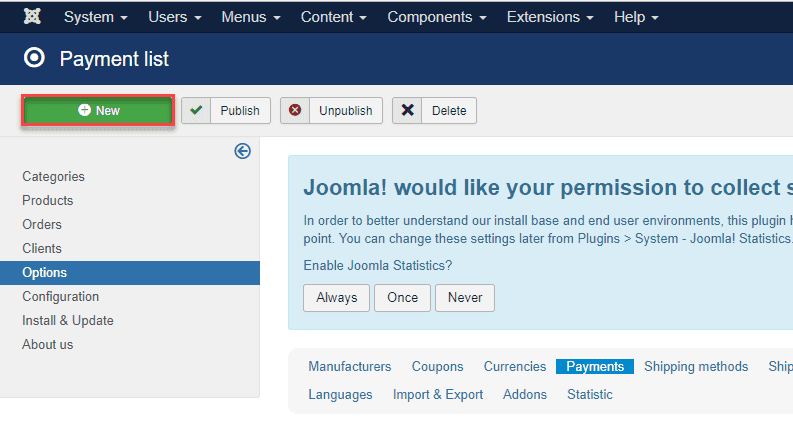
- Select Payment menu.
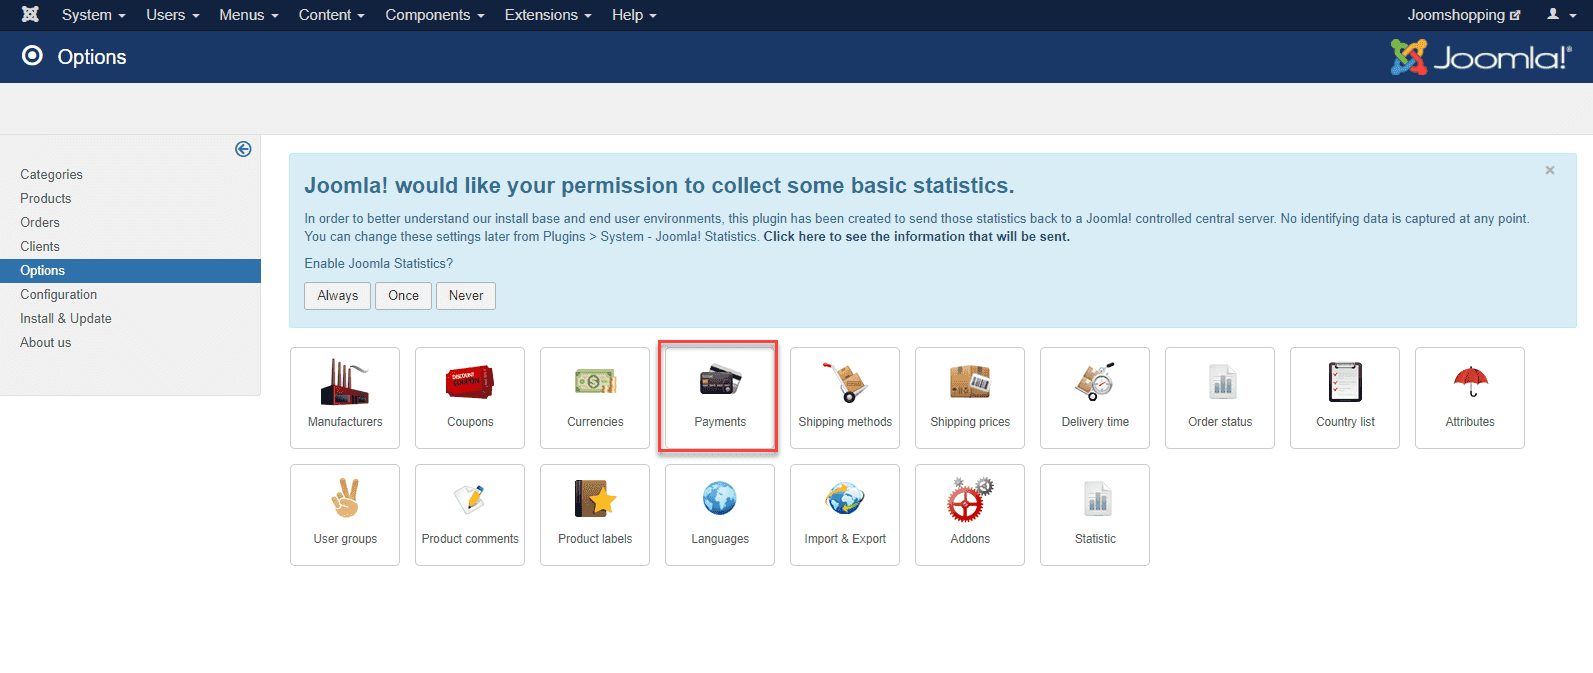
- Click the New button to add payment options from Duitku.
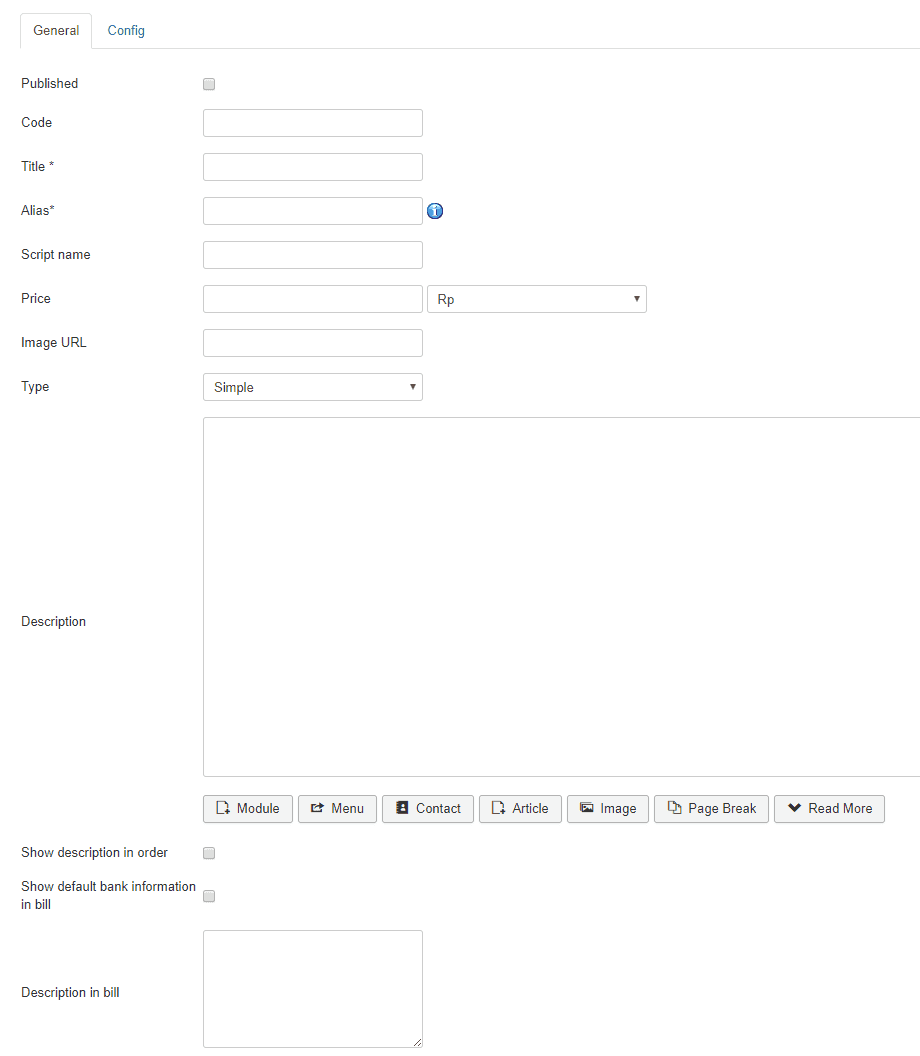
- Fill in the configuration form for the Duitku payment method.
Information :- Published: make sure the checkbox is checked to display this payment option
- Code: enter your Merchant Code that you get from Project on the Duitku merchant page
- Title: enter the name of the payment method (for example: Credit Card, Gem Virtual Account, etc.). List of Payment Methods that can be used: BCA, CIMB Clicks, Credit Card, Mandiri ClickPay, Permata Virtual Account.
- Alias: enter pm_duitku [type of payment method] (example: pm_duitkuCC, pm_duitkuVA)
- Script name: enter pm_duitku
- Price: not required
- Image URL: not required
- Type: select Extended type
- Description: leave it blank
- Show description in order: leave blank
- Show default bank information in bill: leave it
- Description in bill: leave blank
- Click the Save button when it's finished filling out the form
- After filling in the form in the General column, continue by filling in the configuration column (Config).
Information :- Merchant Code: enter your Merchant Code that you get from Project on the Duitku merchant page
- Secret Key: enter the Project API Key that you got from Project on the Duitku merchant page
- URL Redirect: If integration is in the development stage, use this address https://sandbox.duitku.com/webapi
- URL Redirect: If integration is in the production stage, use this address https://passport.duitku.com/webapi
- Payment Type: choose the payment type (BCA, CIMB Clicks, Credit Card, Mandiri Clickpay, VA Permata)
- Order Status for successful transactions: select Complete
- Order Status for failed transactions: select Canceled
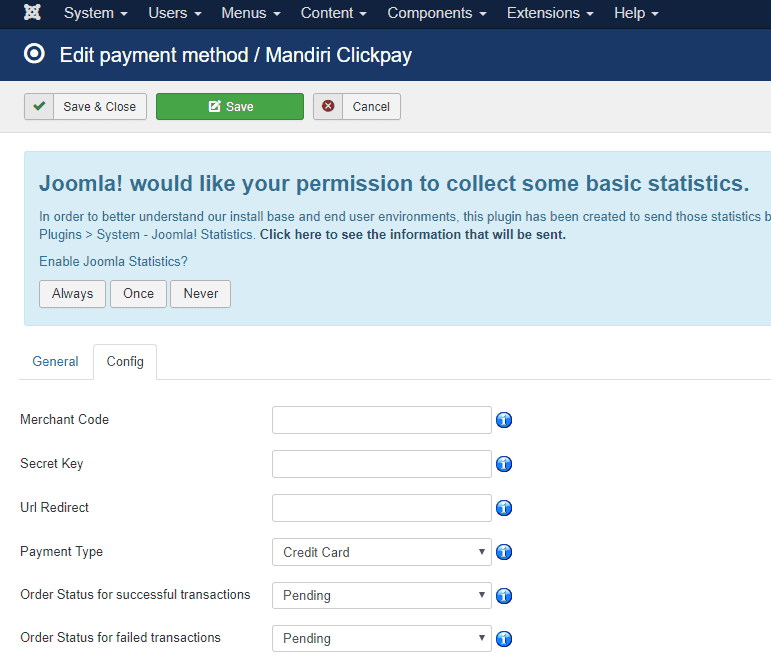
- After completing the configuration form, click the Save button, then repeat the payment gateway for my other Duitku.
- Congratulations, you have successfully installed Duitku plugin for JoomShopping on your site. If there are difficulties or further questions, please contact us on Live Chat or email at [email protected]
- Download the Duitku plugin for Prestashop.
- Prestashop 1.6.x.xDownload Here
- Prestashop 1.7.x.xDownload Here
- Extract the downloaded file.
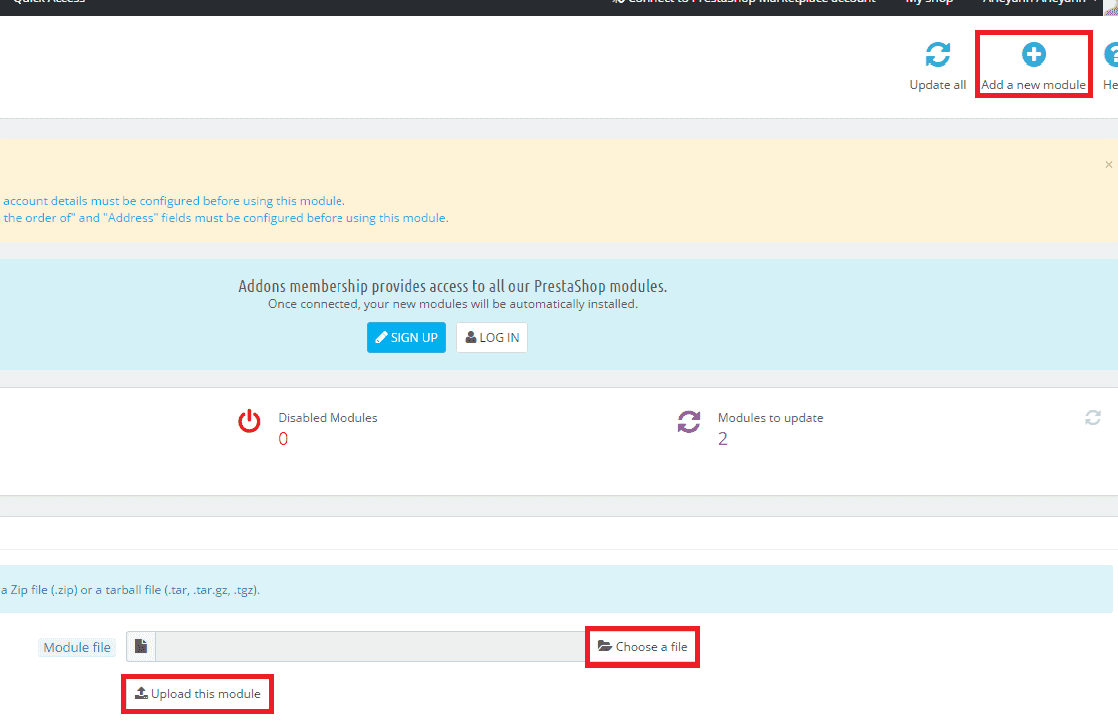
- Log in to your Prestashop Admin area (generally in /admin), open the Modules and Services menu ➜ Modules and Services.
- Click the Add New Module button.
- Select the Duitku plugin file that will be uploaded to the file that was extracted before (example: creditcard, Mandiriclickpay, etc.).
- Click the Upload this Module button.
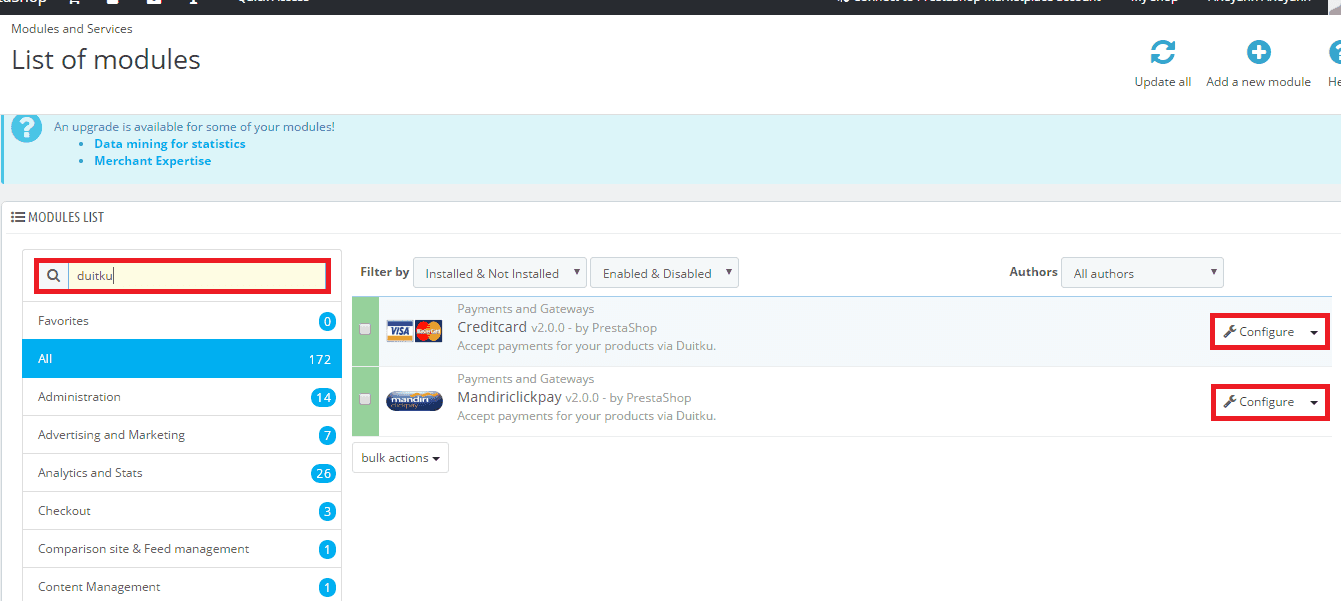
- In the list of available modules, search for the keyword 'Duitku'.
- Several modules will appear, then click install on the module you want to activate.
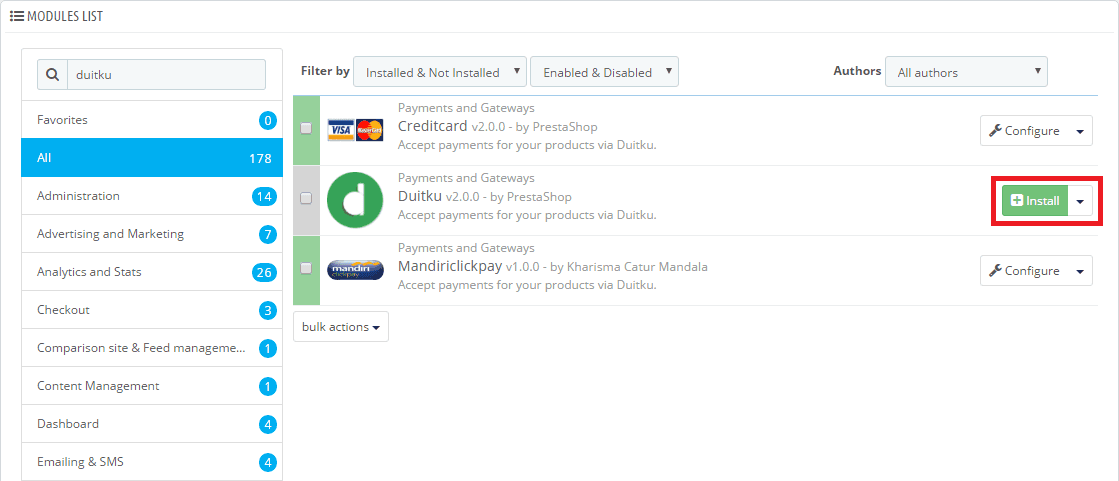
- Click Configure to open the settings page.
- Fill in all the information needed then click the Save button.
These parameters are created on the Duitku merchant page in the Project menu section.
URL:- If integration is still in the development stage, use this address https://sandbox.duitku.com/webapi
- If the integration is in production stage, use this address https://passport.duitku.com/webapi
- Download the Duitku plugin for Prestashop.
- Register and activate your account at Duitku.com.
- Go to your MixRadius dashboard and go to App Settings ➜ Payment Gateway menu, and add payment gateway Duitku as your payment option.
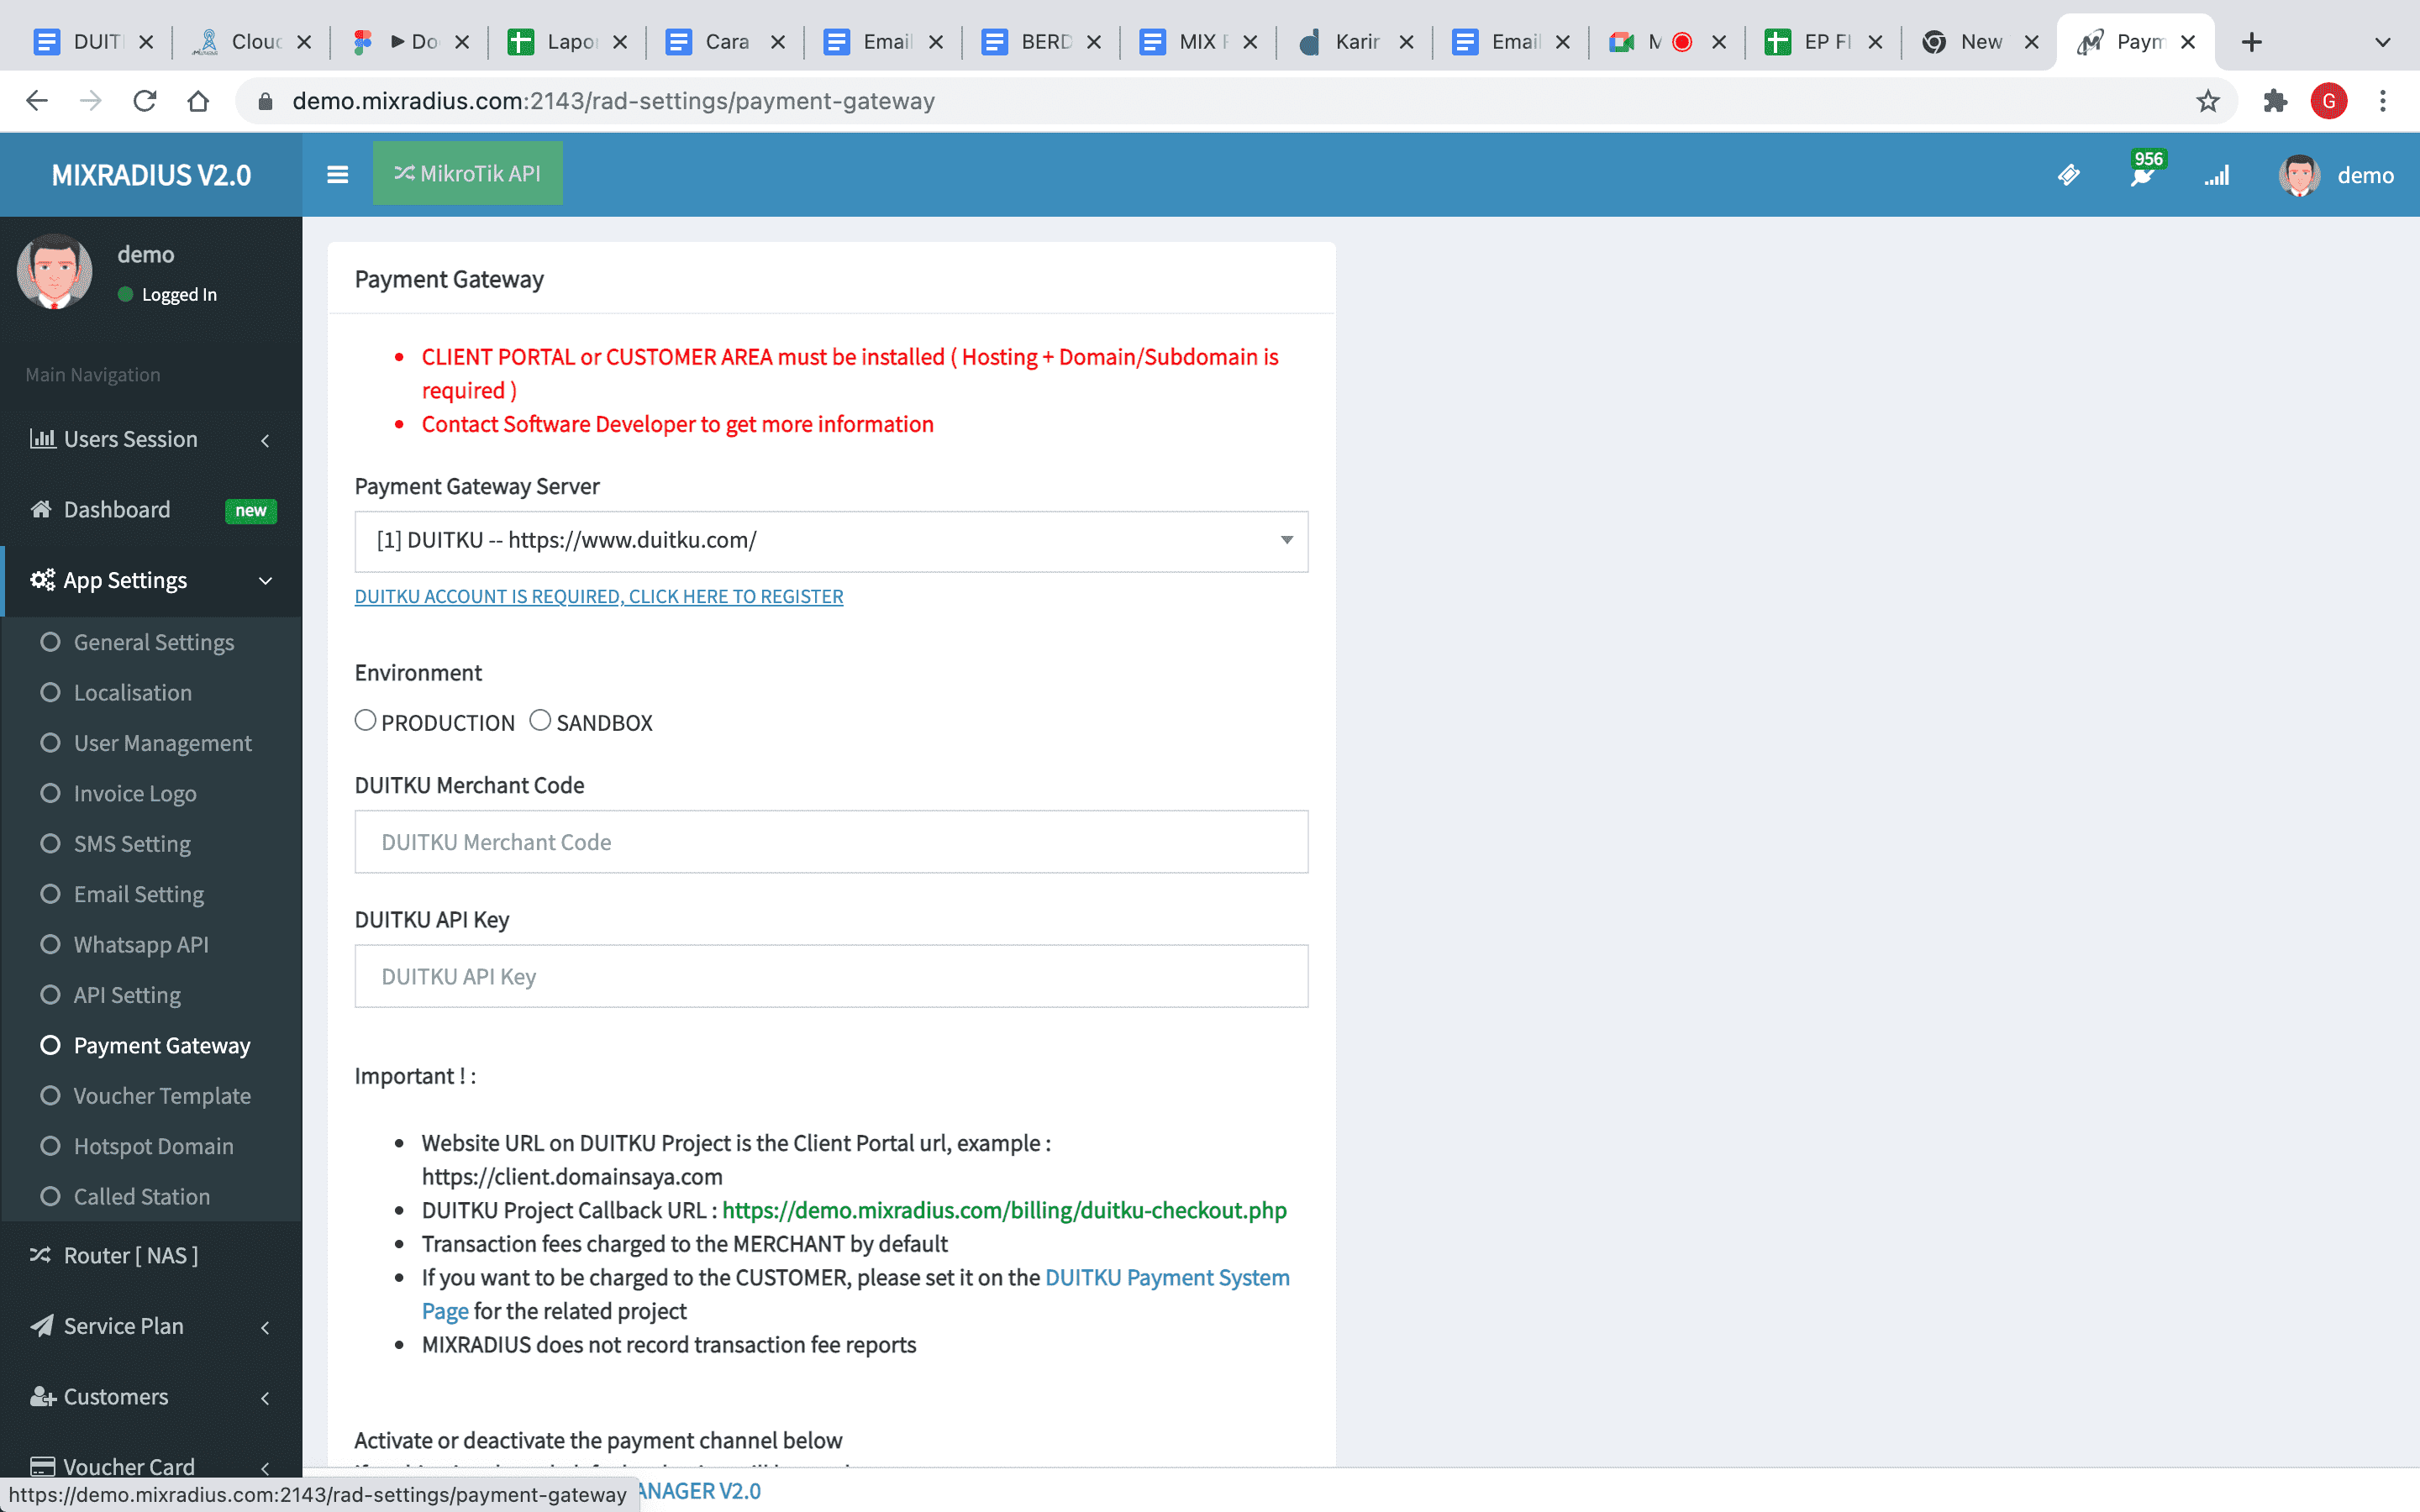
- After you enter the Duitku payment plugin, you will be asked to enter Duitku merchant code and API key on the settings page.
Please Login to dashboard Duitku to get this information in the My Projects menu. Click here for how to register your Project website and get API Key.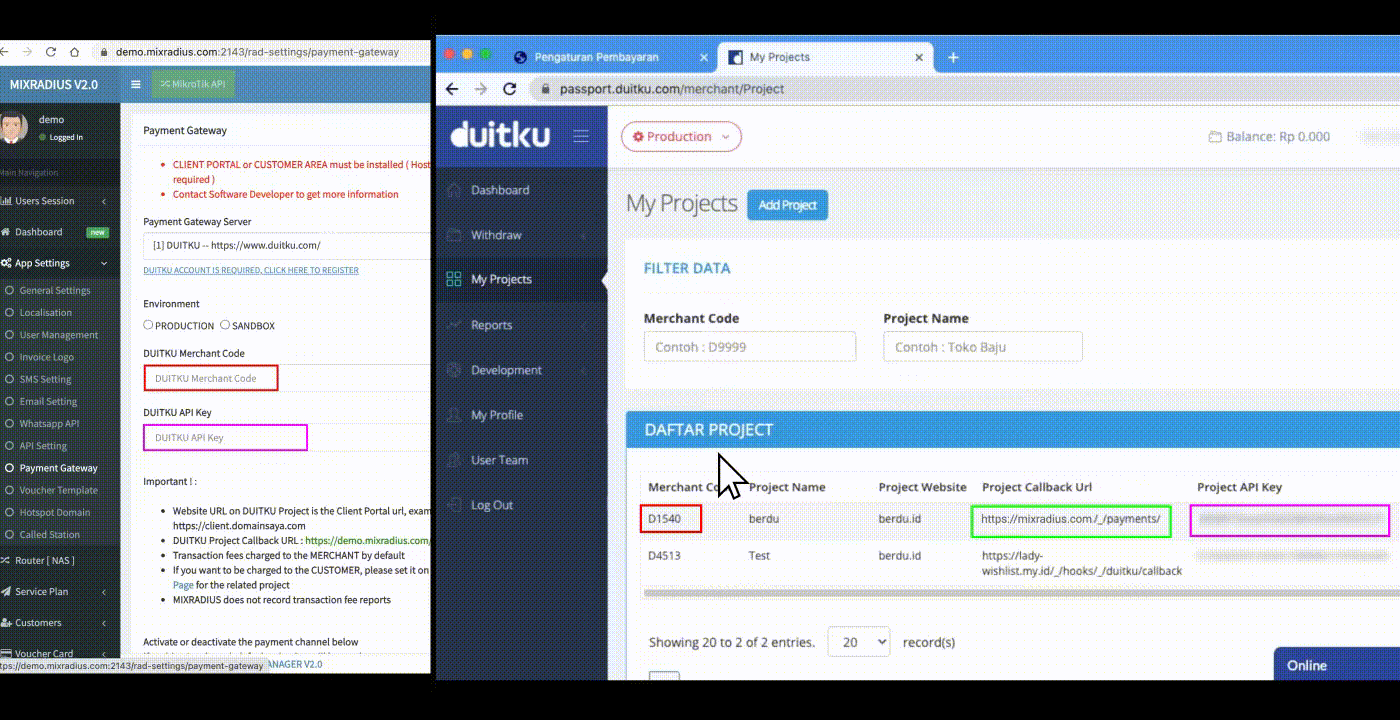
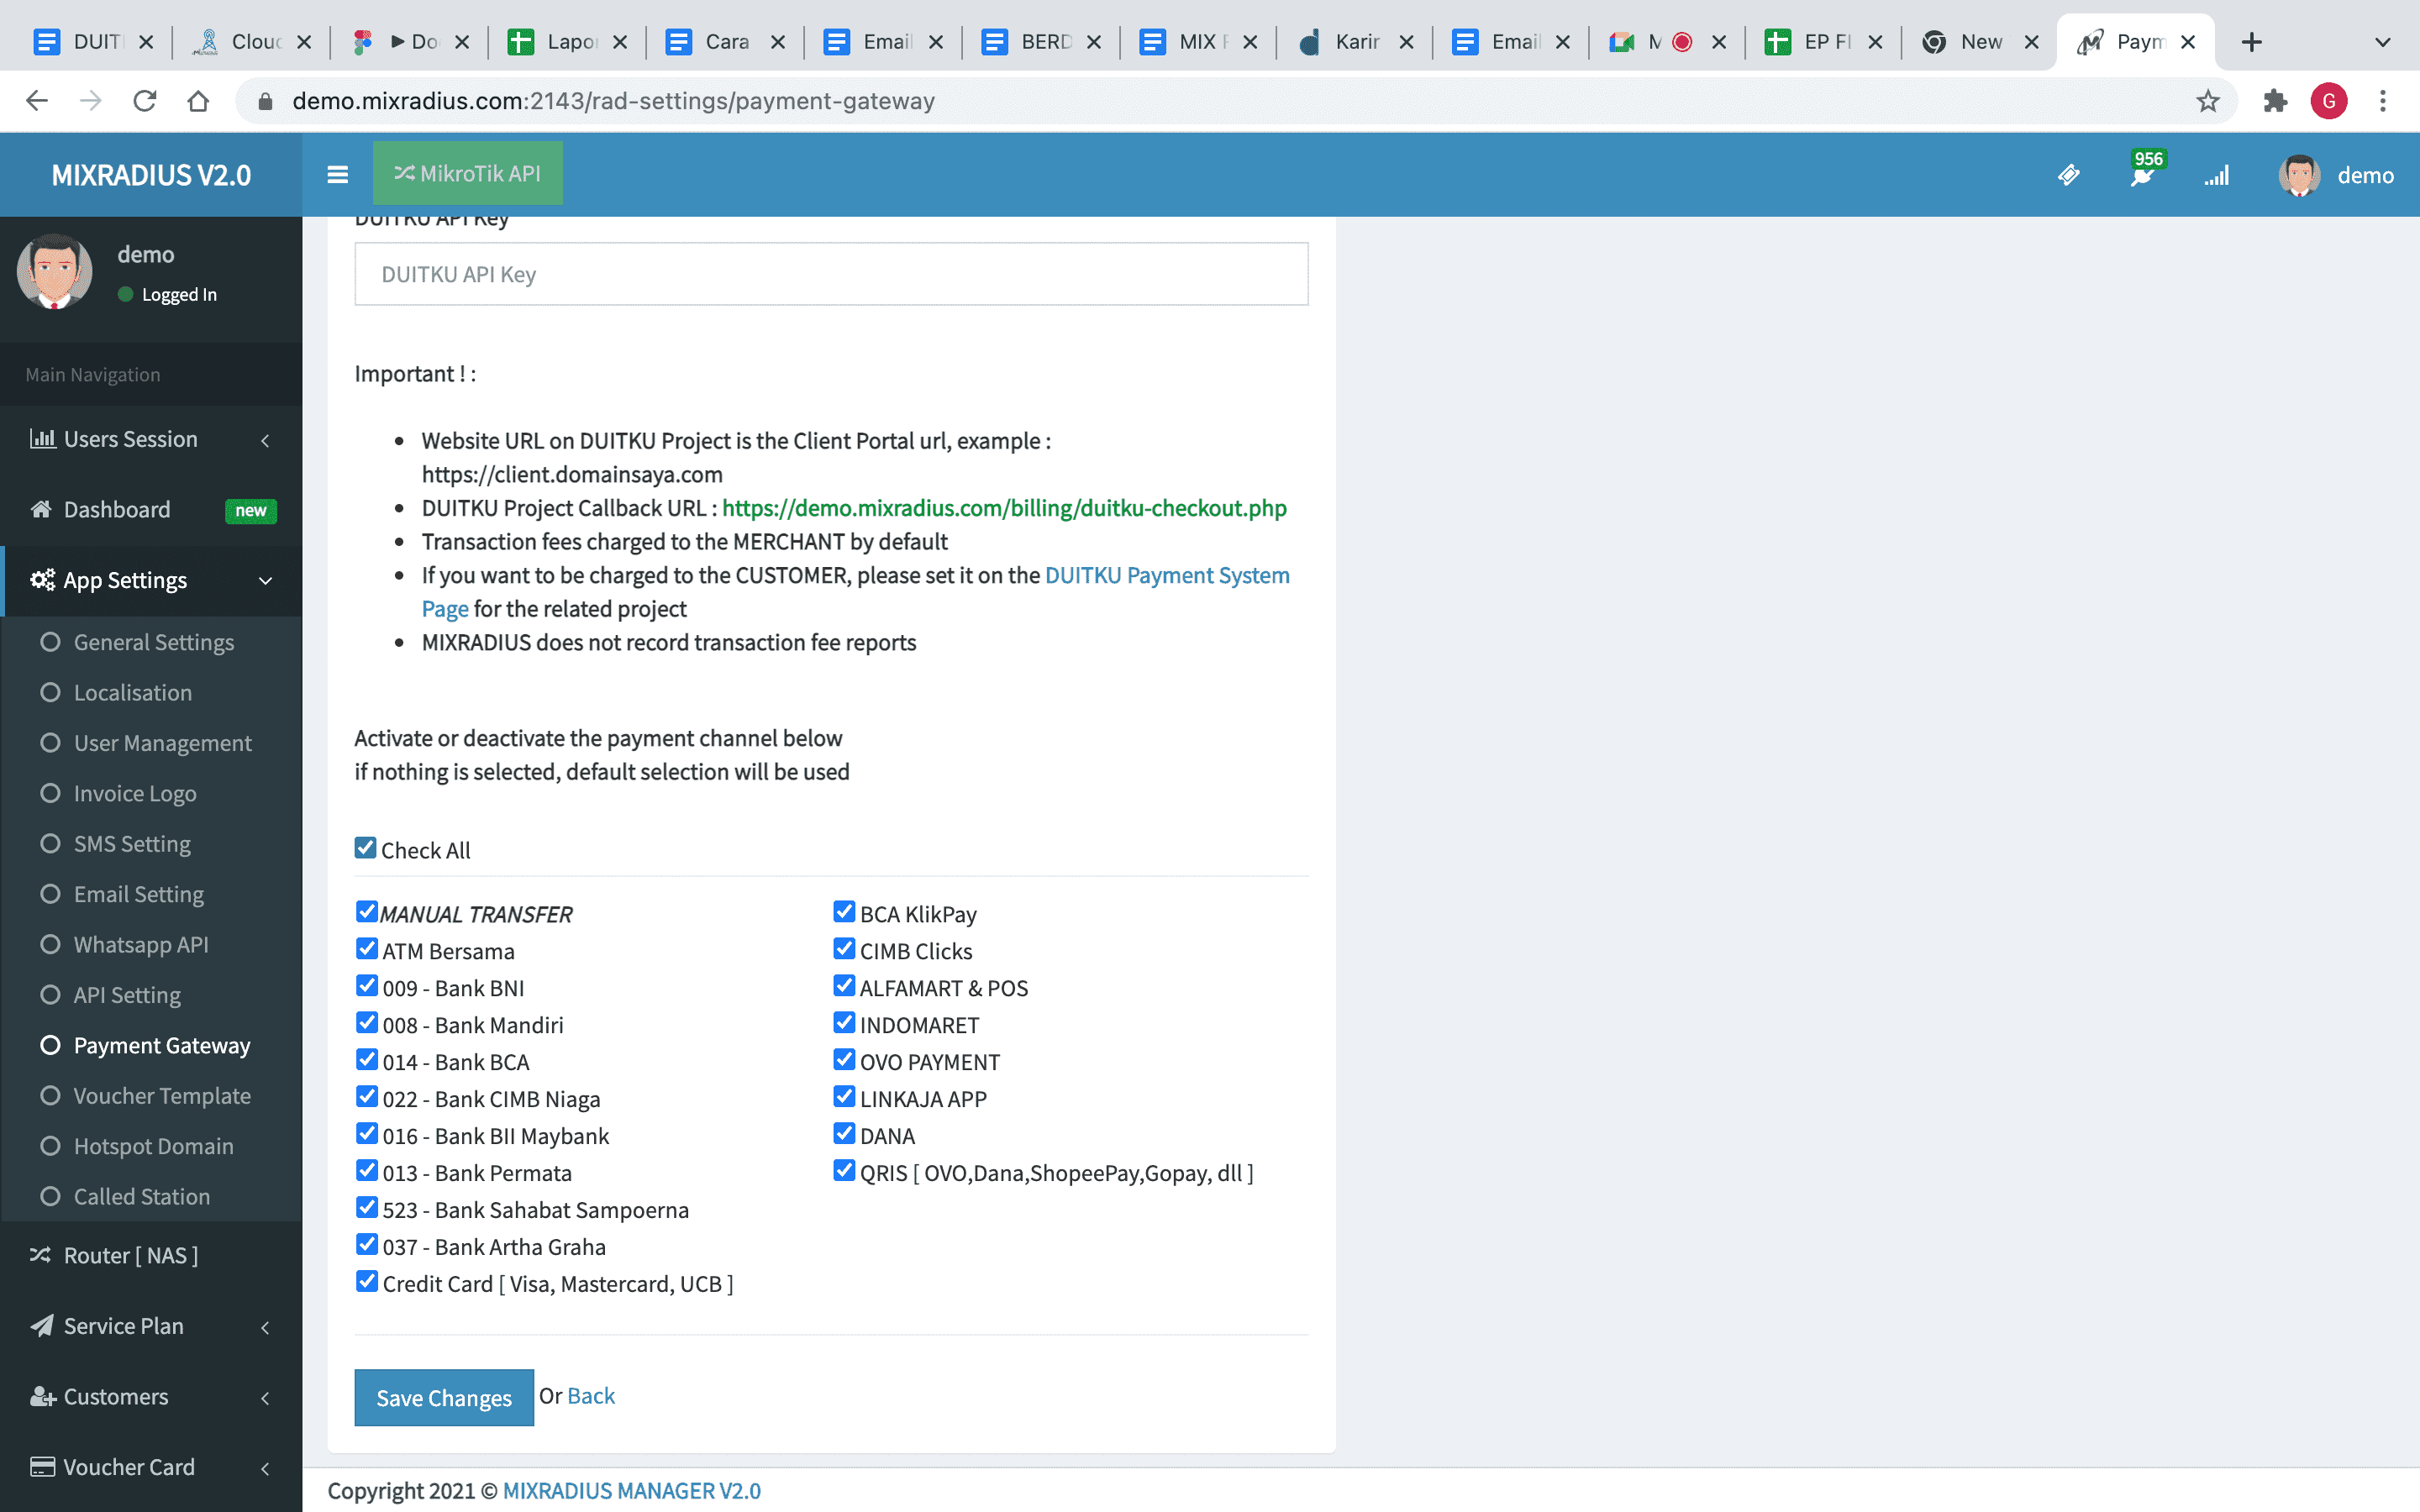
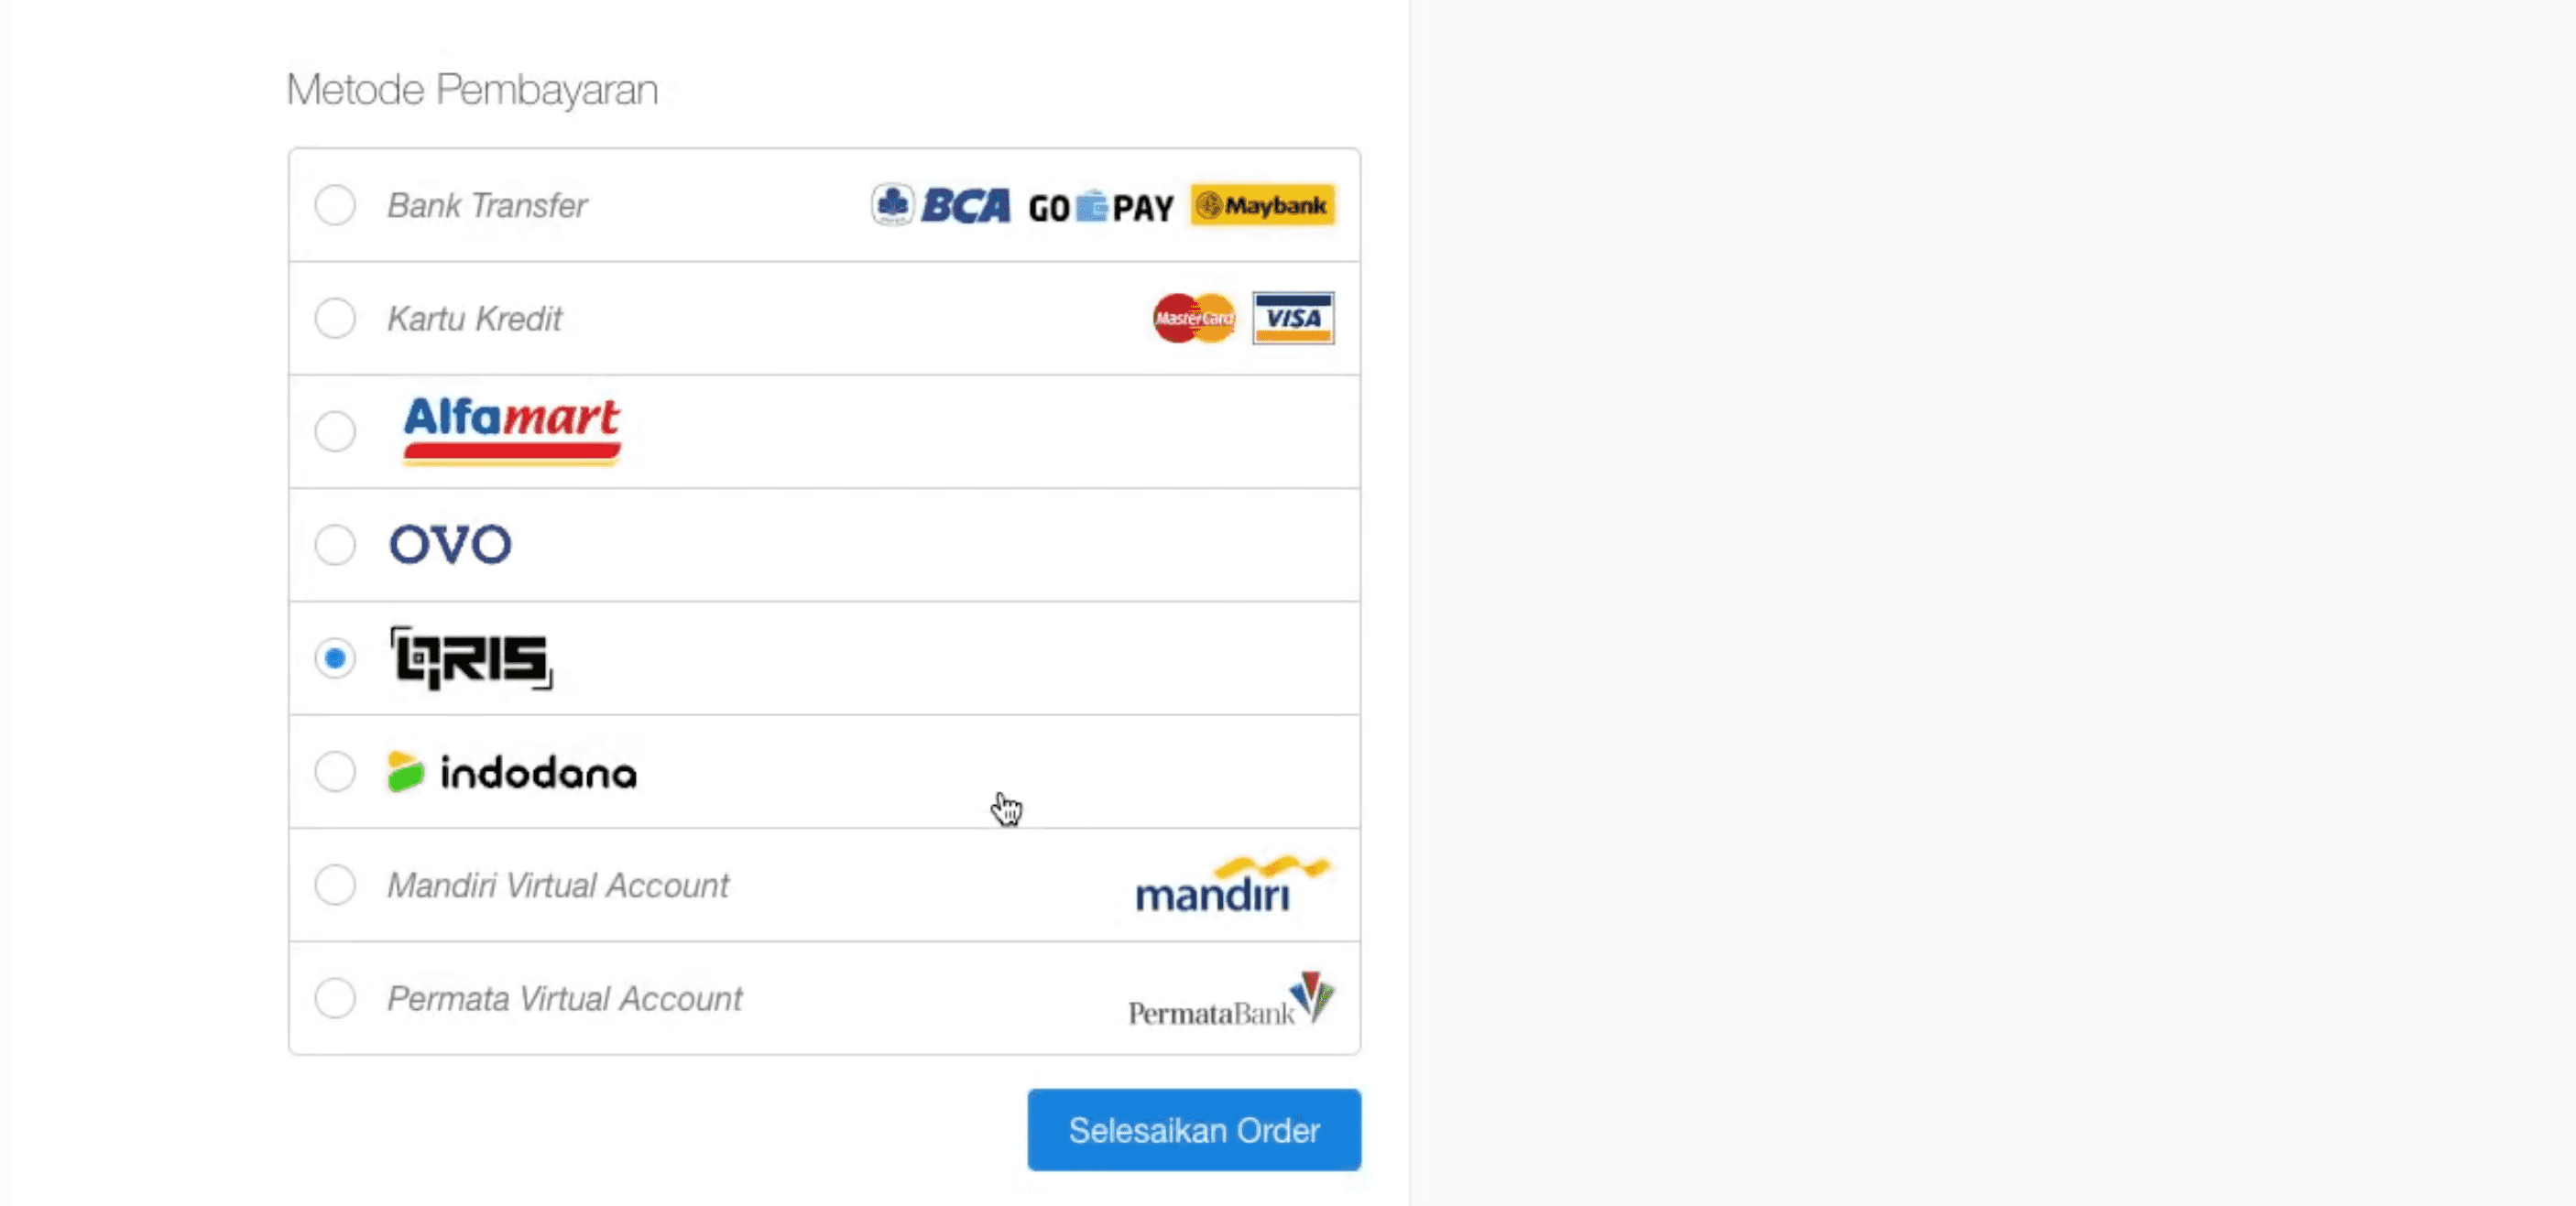
- After entering Duitku merchant code and Duitku API Key, you will be directed to choose a payment method that can be used. Select the payment method you want to use and click the Save Changes button to save your selection.
- If your Duitku account and project have been activated, you can immediately receive payments on your Mixradius-based PPOB website.
- Register and activate your account at Duitku.com.
- Go to your Berdu website dashboard and enter the Settings menu ➜ Payments, and click the + Payment menu in the upper right corner, then add payment gateway Duitku as your payment option.
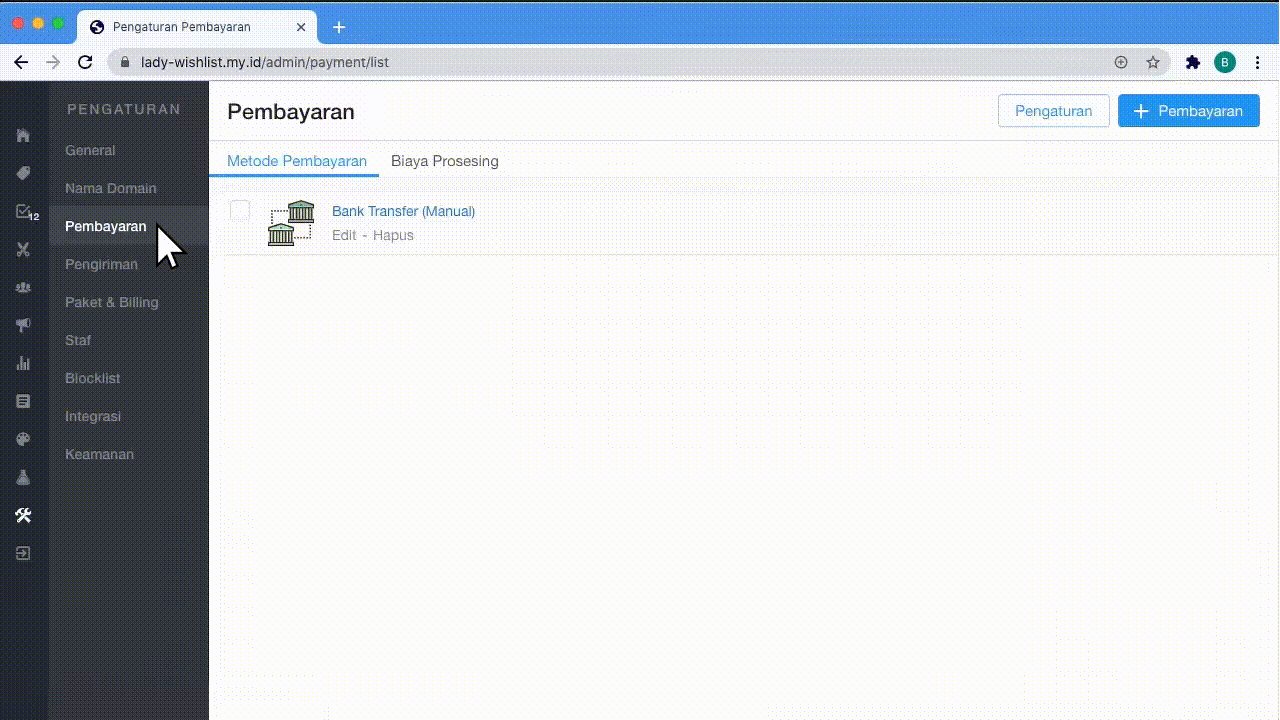
- After you log into Duitku payment plugins, you will be asked to enter merchant code and Merchant key in the dashboard.
- Log in to the Duitku dashboard to get this information in the My Project menu. Click here for how to register your website Project and get an API Key.
For Callback URL, the callback URL will immediately appear on the dashboard page of the website, copy-paste the URL of this website into the My Project details information on the Duitku Dashboard.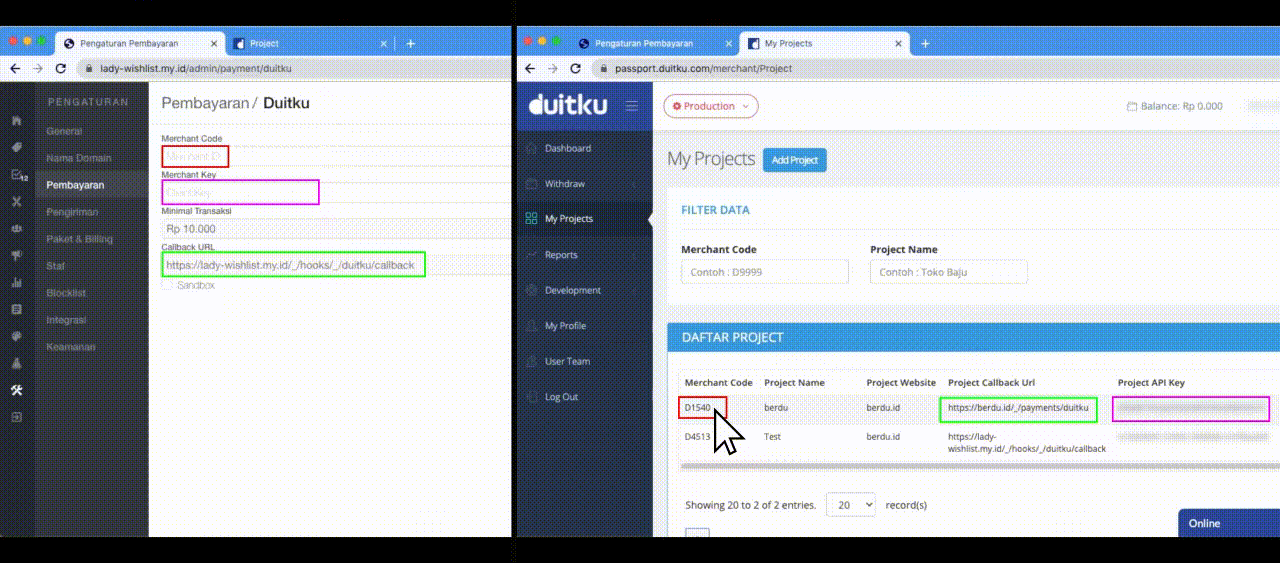
- After entering the Merchant Code and Merchant Key click Save button in the upper right corner, then click the Settings button in the upper right corner and you will be directed to choose the payment method provided and select the payment method via Duitku to get used, and click the Save button.
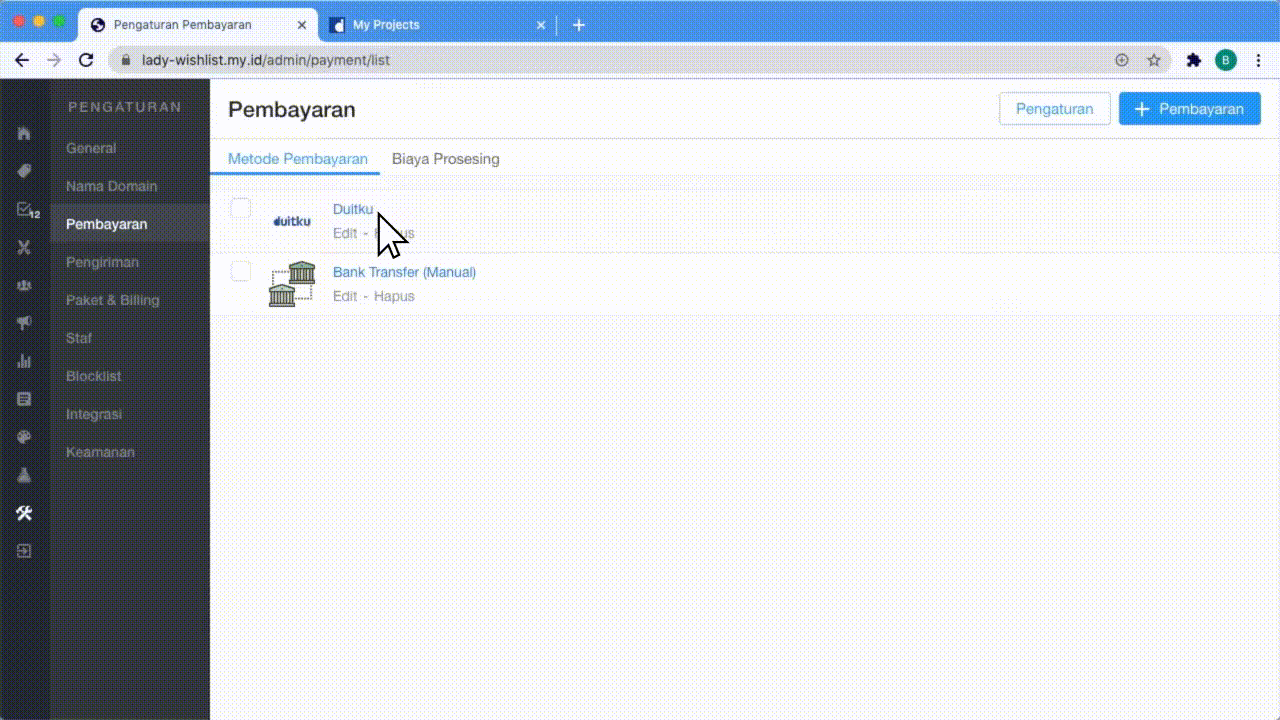
- If your Duitku account and project have been activated, you can immediately receive payments on your Berdu-based website with the added payment method.


Was the information on this page helpful?